- This article is about strategy on the Blackwing Lair Encounter. For character biography, see Nefarian. For strategy on the Blackwing Descent encounter, see Nefarian's End.
| | |
|---|---|
 | |
| Gender | Male |
| Race | Black dragon (Dragonkin) |
| Level | ?? Boss |
| Reaction | Alliance Horde |
| Affiliation(s) | Black dragonflight |
| Location | Nefarian's Lair, Blackwing Lair [75.8, 88.7] |
| Status | Killable |
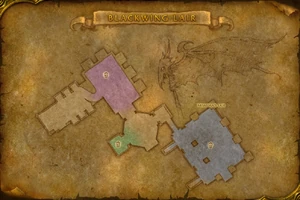
Nefarian is located atop Blackwing Lair after Chromaggus. He has two forms: his Human form, Lord Victor Nefarius, and his dragon form, Nefarian proper. Nefarian is an extremely difficult encounter as it requires a full 40-man raid to win along with strong coordination and leadership. On average, the full encounter consists of 3 stages and takes about 20–30 minutes to finish.
Attacks and abilities
 Bellowing Roar — A massive roar frightens all enemies within 35 yds. of the caster, fearing them for 4 sec.
- Cleave — Inflicts normal damage plus 100% to an enemy and its nearest allies, affecting up to 10 targets.
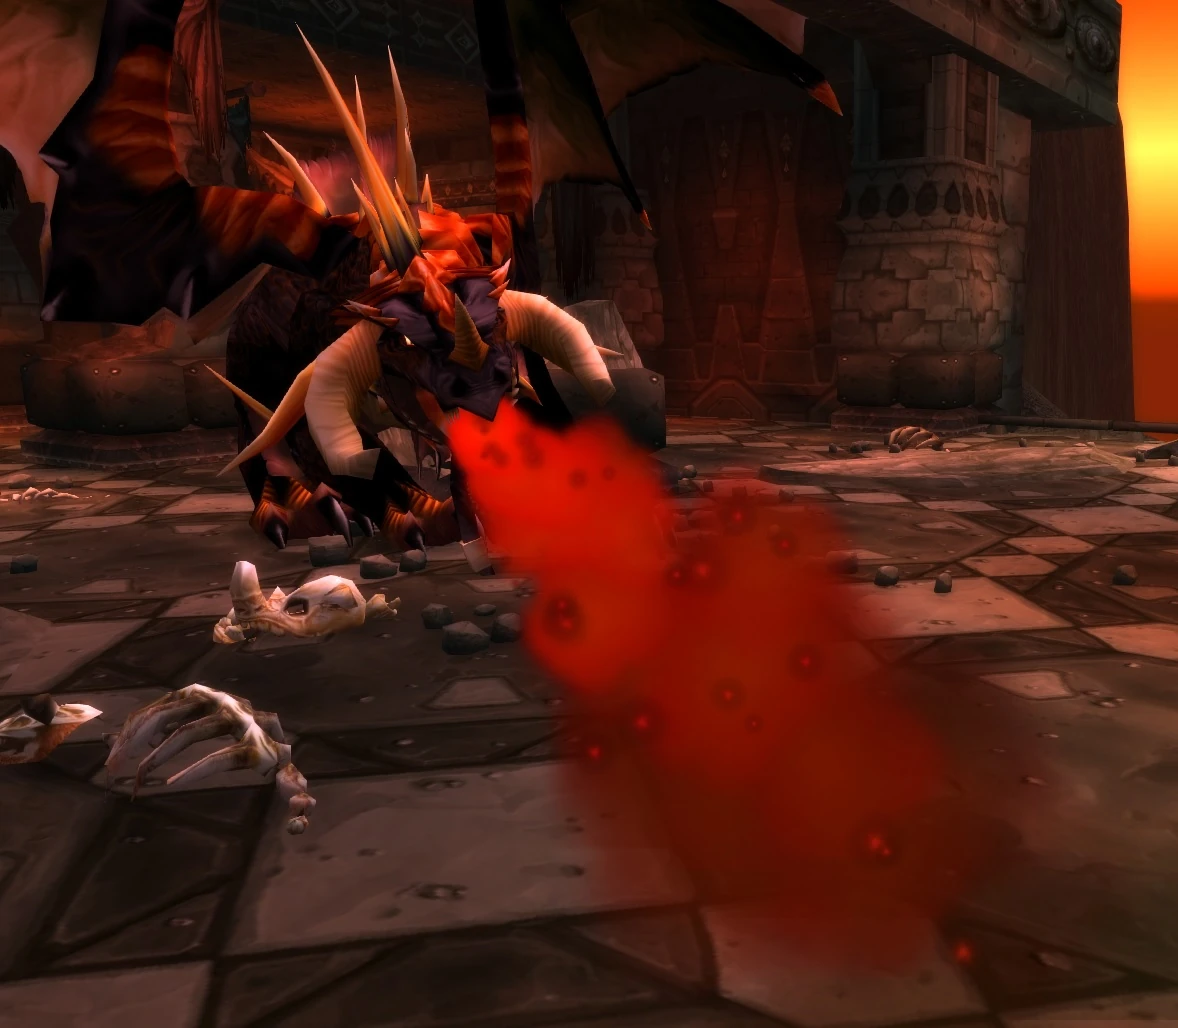
- Shadow Flame — Inflicts 2210 Shadow damage to enemies in a cone in front of the caster.
- Tail Lash — A sweeping tail strike hits all enemies behind the caster, taking 614 damage, causing them to drop their weapon and stunning them for 2 sec.
- Veil of Shadow — Reduces healing effects for an enemy by 75% for 6 sec.
Seasons of Mastery
During the Season of Mastery, the drakonid adds spawn at a significantly faster rate. In addition, the class calls have additional effects that can last beyond the normal duration of the class call, making it possible to have multiple effects active at once.
- Druid: Nightmare Brambles will roam around the floor. Players caught by them will be rooted and take Nature damage over time, though the debuff can be cleansed.
- Hunter: Copies of the hunters' destroyed weapons will spawn and create targeting reticules before attacking outward with Corrupted Shot, dealing 800-1400 damage.
- Mage: Wands will appear that repeatedly cast Arcane Explosion, dealing 350 damage and knocking back players.
- Paladin: Swords will spawn that create large areas of Consecration, dealing 200 damage per tick.
- Priest: Shadow Orbs will appear that cast Mind Flay on nearby players.
- Rogue: Corrupted Weapons will spawn and deal shadow damage to random players.
- Shaman: Bouncing Bolts will spawn and bounce throughout the room, afflicted nearby players with Pulse Lightning. Players with Pulse Lightning have increased damage and movement, attack, and casting speed; they also deal lightning damage to nearby players every second.
- Warlock: Shadow Orbs will appear that attack with a wave of slow-moving Corrupted Coils that must be dodged.
- Warrior: Corrupted Weapons will spawn that will charge random players and cast Corrupted Slam, dealing 800 damage and stunning them for 2 seconds.
Strategy
Phase 1
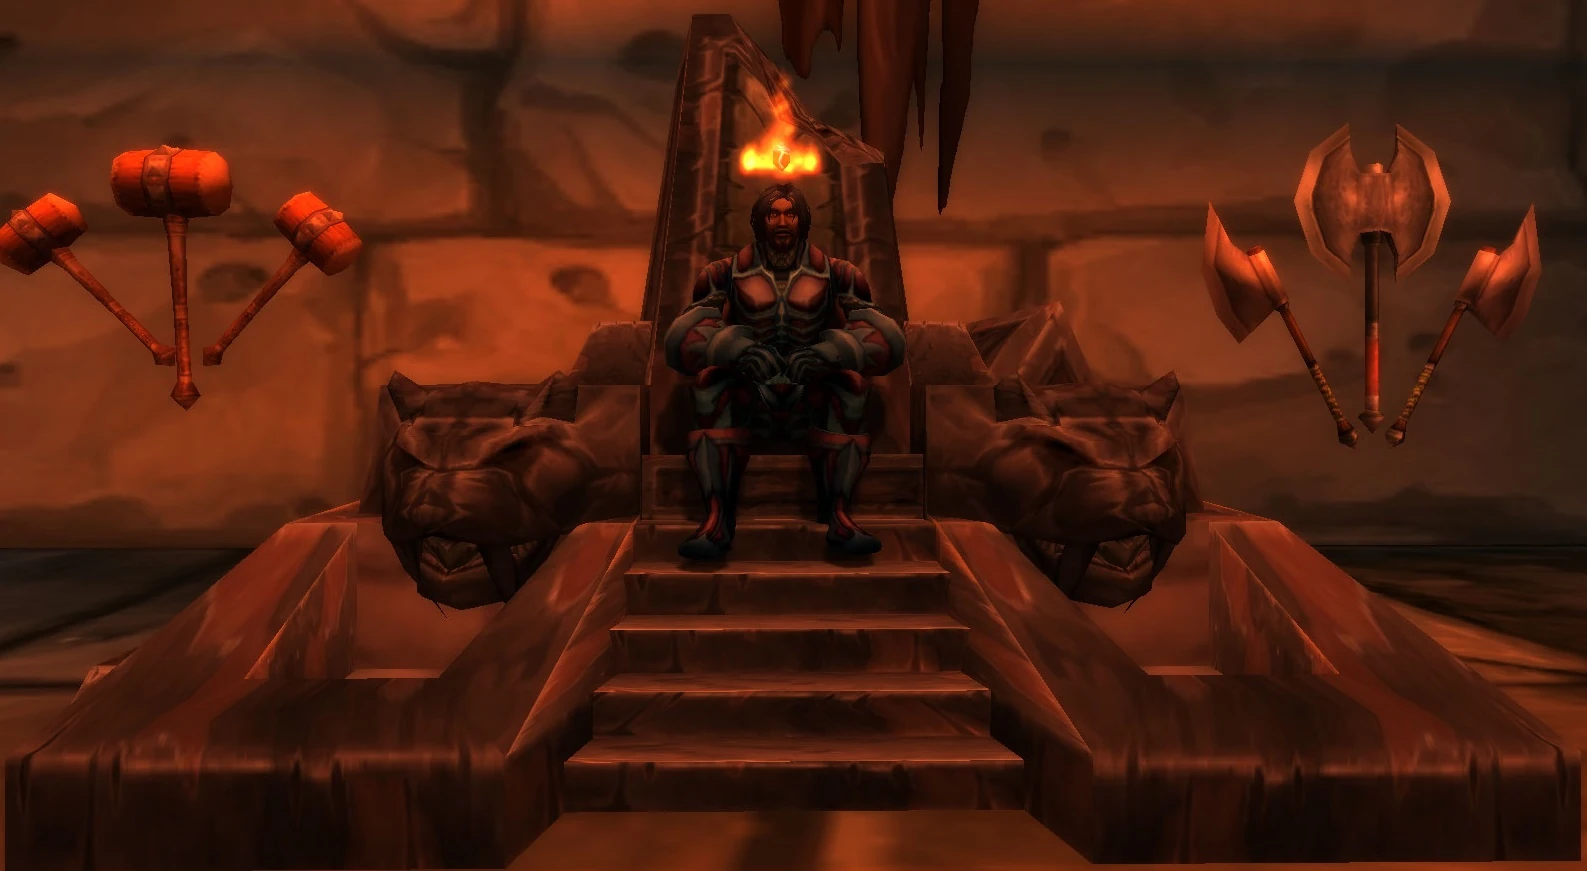
To activate the Encounter a person must walk up to Nefarian's throne and talk through what he says. Upon completion of this he says "Let the Games begin." From here, Nefarian is invulnerable, and walks amid the raid randomly shadow bolting, mind controlling people and casting fear on random targets. The room begins to flood with drakonids at the same time.
Phase 1 of the fight consists of defeating the drakonids.
There are 6 types of drakonids that spawn. In every Nefarian encounter you will fight Chromatic Drakonids; the largest and toughest drakonids. Fortunately they spawn in far fewer number than the other colors. In addition to the Chromatic Drakonid, 2 other random colors of drakonids will spawn as well. One color will spawn from the southern door, and one color will spawn from the northern door. Colors are fixed for each instance: if Nefarian is attempted multiple times before the instance resets, the same color combinations will appear.
Different colors of drakonids have different special abilities and are resistant to different schools of magic. Note that, unlike some other Blackwing Lair mobs, these drakonids are not particularly vulnerable to any magic. Below is a list of their colors and associated abilities / resistances:
- Red Drakonids - Short range cone DoT fire attack, stacks; resistant to Fire
- Blue Drakonids - Attack which drains mana; resistant to Frost; slightly resistant to Arcane; Lowers attack speed
- Green Drakonids - Stun, resistant to Nature
- Black Drakonids - Moderately powerful direct damage fire attack; resistant to Shadow and Fire
- Bronze Drakonids - Reduces Attack and Cast Speed; resistant to Arcane
The Drakonids can be killed by either AoE attacks or direct damage and aside from Chromatics, they do not hit very hard and do not have a lot of health.
Doorway method
Raid is split up into groups so that DPS is split up as evenly as possible. The easiest way to do this is start with a Physical assist train on one side (Hunter, Rogue, Warrior) with nuker/AoE classes (Mage, Warlock, Paladin, Shaman) on the other, with healers and tanks being split evenly. At least 2 to 3 tanks need to be designated per side to be able handle Chromatic Drakonids. Taunt moves should be enough to hold mobs, but any that leak should be the primary target, followed by a designated assist target.
Ranged DPS classes (Mage, Warlock, Hunter) and healers should be positioned max range from either door so that they can switch sides quickly. Hunters can be moved between sides to tweak the DPS balance. Hard, steady DPS is crucial so if one side is waiting for spawns, people need to switch over; the non-chromatic drakonids shouldn't live past taunt duration while chromatics have significantly more health and need to be "sunder" tanked.
- ALWAYS AOE the Red Drakonid group. (Warlocks DoT with Corruption/CoA then Shadowbolt.)
- ALWAYS Assist-train the Blue Drakonid group.
- DPS is preferred on Black Drakonid groups, unless you get Black/Blue.
- AOE is preferred on Bronze Drakonid groups, unless you get Red/Bronze.
- Green Drakonid groups are governed by the other color that appears with them.
For Black combos, Warlocks should be switched off with Hunters so that they can make full use of their moves. Blue doesn't impact +hit/-resistance Mages too badly but it might help to add Hunters to assist train mobs.
Red and bronze drakonids should be handled primarily by casters and only melee with called out healers.
Green drakonids are the least harmful so this side should be composed mainly of dispellers and classes that wouldn't do versus the other color.
Phase 2
After killing 42 Drakonids, no more will spawn (you still have to kill all the others that are up), and Nefarian will land on the balcony in the Dragon Form. This is the beginning of Phase 2 of the encounter. Before landing, he will have cast an AoE (ignores LoS), Shadow Flame, on the entire raid. This version of the spell does about 1000 shadow damage and is completely resistible. Previously, every member of the raid must have been wearing ![]() [Onyxia Scale Cloak] to avoid the fatal DoT from Shadow Flame (frost mages could use their
[Onyxia Scale Cloak] to avoid the fatal DoT from Shadow Flame (frost mages could use their ![]() [Ice Block] ability and paladins could use their
[Ice Block] ability and paladins could use their ![]() [Divine Shield] ability to avoid the Flame without the cloak). By now, most of the drakonids should be dead. Move your raid to this area and start DPSing him down, from here on out it is simple damage dealing with a few twists. It should be noted that, if your raid attempts the AoE version of Phase 1 and stays near the throne, you can stand BEHIND the throne and NOT be hit by Shadow Flame. It is the only place in the room that has this property (and is therefore was the only way for someone without a Cloak or immunity shield to live).
[Divine Shield] ability to avoid the Flame without the cloak). By now, most of the drakonids should be dead. Move your raid to this area and start DPSing him down, from here on out it is simple damage dealing with a few twists. It should be noted that, if your raid attempts the AoE version of Phase 1 and stays near the throne, you can stand BEHIND the throne and NOT be hit by Shadow Flame. It is the only place in the room that has this property (and is therefore was the only way for someone without a Cloak or immunity shield to live).
He has all the abilities of normal dragons: Conical breath attack (shadow based), ![]() [Cleave], and Bellowing Roar. He also does Veil of Shadow on the target nearest to the center of his hitbox. Nefarian casts an AOE fear roughly every 30 seconds. The ground shakes immediately before this occurs, giving the MT time to stance dance and use berserker rage. Alternatively, have any priests cast fear ward on the MT. It's worthy to note that his fear has limited range of about 35 yards, so ranged DPS and healers can completely avoid it by proper positioning.
Approximately every 25–35 seconds he will "call out" a specific class. During class-call outs, that class will have some negative effect on them. Below is a list of each class and the effect their call-out has on them:
[Cleave], and Bellowing Roar. He also does Veil of Shadow on the target nearest to the center of his hitbox. Nefarian casts an AOE fear roughly every 30 seconds. The ground shakes immediately before this occurs, giving the MT time to stance dance and use berserker rage. Alternatively, have any priests cast fear ward on the MT. It's worthy to note that his fear has limited range of about 35 yards, so ranged DPS and healers can completely avoid it by proper positioning.
Approximately every 25–35 seconds he will "call out" a specific class. During class-call outs, that class will have some negative effect on them. Below is a list of each class and the effect their call-out has on them:
- Effect: Casts [Death Grip] on the entire raid, pulling everyone inside his hitbox.
- Solution: Simply run back to your positions - unlike the rogue call, this one does not immobilize teleported players for the duration.
- Effect: Blacks out the screen of the controlling player.
- Solution: Tab-target and keep attacking.
- Effect: Stuck in [Cat Form] for duration of the call.
- Solution: Safest call is to stay back and wait for the debuff to wear off. Some raids may let the Druids run up and DPS, however this puts them at risk for getting feared into the Shadowflame and dying. Mages should get ready to decurse the Veil of Shadow off the MT.
- Effect: Transformed into a Pitiful Whelp with drastically reduced damage and healing for 20 seconds.
- Solution: None in particular. Your normal abilities will still work, they're just extremely weak.
- Effect: Equipped ranged weapon instantly broken.
- Solution: Hunters should either manually unequip their bow or set up a macro to instantly unequip just before all class calls. Be sure to bring extra ranged weapons in the event your bow/gun does break. Alternatively, equip a second ranged weapon immediately prior to all class calls, then switch back to the main weapon after. Using a cheap weapon (gray quality) will reduce repair bills incurred, but will reduce DPS during the seconds when it is equipped.
- Effect: Cast Wild Polymorph on random raid members, which has no range or Line of Sight (LoS) restrictions.
- Solution: Mages can use Ice Block to remove this debuff, but priests and paladins need to be ready to Dispel Magic and Cleanse polymorphed players, especially tanks. Wild Polymorph has no range or line-of-sight limitations, so moving away from the raid or behind the nearby pillars is ineffective; mages can continue to DPS through this call.
- Effect: Uncontrollably [Roll] around for about five seconds.
- Solution: None in particular, just wait it out and run back.
- Effect: Cast [Blessing of Protection] on Nefarian.
- Solution: Paladins should cast Judgement of Wisdom on Nefarian, and all casters should wand back mana while he is protected. (It is advisable to cease damage during this call as the MT won't be able to gain more aggro. Healer heal, the rest can lean back and regenerate mana.)
- Effect: Direct Heals will subsequently DoT their target with Corrupted Healing ( [Renew] and [Power Word: Shield] do still work normally though). The DoT is stackable and can end up doing a lot of damage if not caught quickly.
- Solution: Stop use of direct healing spells for the duration. Druids, Paladins, and Shaman must compensate. Three or more stacks of this debuff makes the Main Tank very difficult to heal. Priests can stack Renew the main tank and wand Nefarian for mana (with Judgement of Wisdom on Nefarian).
- Effect: Teleported and immobilized in place close to Nefarian.
- Solution: In some cases Rogues will be rooted in a "safe" spot and MT adjustment is not required. If rogues do get rooted in the Cleave/Shadowflame area, the MT must turn Nefarian 45-90 degrees away from the raid to prevent rogue deaths.
- Effect: Give Nefarian buffed totems, including windfury, and fire nova. Corrupted Totems have between 200 and 2000 HP and they very quickly will become a veritable forest of totems. Concentrated firepower isn't needed to take down totems, but weaker melee hits won't destroy some totems in single hits. The totems, while problematic, sound worse than they are - the major issue (raid-wide) here will be DPS on Nefarian becoming nonexistent due to clean up efforts or losing someone extremely low on health due to getting hit by a fire nova pulse. The worst part about this call is the huge drain on shaman mana and mana regeneration. It is not a good idea to enter Phase 3 when these totems are up, as the Bone Constructs will receive the buffs from the totems.
- Solution: All single target DPS switch to the totems and bring them down as fast as possible. There's not much else to do besides weather the tax on shaman mana - if shaman are low on mana, waiting to drink a mana potion until AFTER their call is over may spare them a wasted potion and some totem spawns.
- Note: Pressing V on your keyboard (or whatever key you have set to enable enemy health bars on-screen) is very useful for this part.
- Effect: 2 Infernals per Warlock are summoned. They will stun and do minor (physical?) damage to the warlock and those immediately surrounding them.
- Solution: The infernals are immune to fire damage but are easily taken down by mage AoE. Assistance from Rogues and Warriors is also helpful. Warlocks, try to stand in an isolated area in the back of the raid for the duration of Phase 2 to avoid stunning healers when the Infernals come down. Having your mages stand near the Warlocks and setting up a frost Nova rotation helps to keep them contained.
- Effect: Stuck in [Berserker Stance] plus an additional 30% damage taken for duration of the call.
- Solution: Extra heals for the MT. The MT also needs to make sure that Stance Sets is not enabled or he'll likely unequip his shield. At the end of the debuff Warriors must manually return to their desired stance. The raid should also watch its damage output, as the main tank will not be generating the extra threat ordinarily caused by defensive stance.
Phase 3
When his health reaches 20% he will resurrect all the Drakonids killed in Phase 1 as "Bone Constructs". They hit fairly hard but do not have a lot of health, so they are relatively easily AoE'd to death. It is advisable to move AoE groups into position where the Drakonids were originally killed prior to reaching 20% HP to ensure their swift elimination, and to avoid healers getting swarmed. It is also advisable to wait for an appropriate call, where you don't lose any healing. Since the Bone Constructs are classified as Undead they are vulnerable to Paladins' ![]() [Holy Wrath], which should be used in conjunction with other AoE sources. An effective technique for Paladins is: 1.) BoP a Mage 2.) Divine Shield 3.) Holy Wrath 4.) Use Stratholme water (if you brought some along). This would be an ideal time for the non-MT Warriors to pop
[Holy Wrath], which should be used in conjunction with other AoE sources. An effective technique for Paladins is: 1.) BoP a Mage 2.) Divine Shield 3.) Holy Wrath 4.) Use Stratholme water (if you brought some along). This would be an ideal time for the non-MT Warriors to pop ![]() [Shield Wall] and
[Shield Wall] and ![]() [Challenging Shout] in a staggered order to ensure adds do not attack healers (assuming these abilities are not on cooldown from Phase 1). Corrupted Shaman Totems from the Shaman class call will affect the adds; it is advisable to have those totems killed before the adds spawn.
Note that if your computer isn't top of the line you will have extremely low FPS when the drakonids are resurrected, so make sure you turn your graphics down and do anything else you can to increase performance before the fight.
[Challenging Shout] in a staggered order to ensure adds do not attack healers (assuming these abilities are not on cooldown from Phase 1). Corrupted Shaman Totems from the Shaman class call will affect the adds; it is advisable to have those totems killed before the adds spawn.
Note that if your computer isn't top of the line you will have extremely low FPS when the drakonids are resurrected, so make sure you turn your graphics down and do anything else you can to increase performance before the fight.
After this he continues to cast his class debuffs up till he dies.
Nefarian encounter can be reattempted any number of times, however, it takes 15 minutes for him to reset after a wipe (as of patch 1.9.3). Prior to this patch, once the battle had progressed to Phase 2, and the remaining Drakonids had all been killed, the gates would never re-open. Therefore, a Soulstone or other wipe prevention must have been in place, or the battle could not be re-attempted until the instance had reset completely. Nefarian would still respawn after 15 minutes.
An alternate strategy for Phase 3 is to have all the AoE move towards the Drakonids have the entire raid (with the exception of the MT) move to one spot, the Heal Aggro alone will draw the Drakonids where Mage AoE becomes much easier and much more effective.
High level and solo strategy
Start the encounter then move to the door close to the throne. AoE all of the adds until 42 of them are killed, then finish off the stragglers. Let Nefarian land and blow him up. At 20%, he will resurrect the drakonids previously killed, so either pause DPS on the boss and clear the adds, or finish him off and then re-kill the adds, as they will not despawn on his death.
Hunter macro for ranged weapon unequip
This macro was updated patch 3.2, you may use this to unequip then equip your weapon. When you see his call simply use it to remove the weapon and after the call comes then use it again to equip the weapon once again and continue to attack. Note: you need the first backpack (the original bag) slot empty for this to work!
/run local p,s="player",18 if GetInventoryItemLink(p,s) then PickupInventoryItem(s)PutItemInBackpack() else PickupContainerItem(0,1)EquipCursorItem(s) end
Loot
As of patch 3.2.2 the Tier 2 helms that dropped from ![]() Onyxia have been moved to Nefarian's loot table.[1]
Onyxia have been moved to Nefarian's loot table.[1]
Nefarian drops three tier pieces, two non-set epic items, and one ![]() [Head of Nefarian] (Alliance / Horde), alongside other rare and uncommon-quality loot.
[Head of Nefarian] (Alliance / Horde), alongside other rare and uncommon-quality loot.
Related achievements
Quotes
- Gossip text and aggro
- Do you expect me to cower before the mighty legion of <name>?
- You are nothing to me. Less than nothing. Had I desired your head, it would have been presented to me on a pike.
- You have made the mistake that all mortals make.
- <Lord Victor Nefarius sighs.>
- Time does strange things to those that use it as a form of currency.
![]() I've made no mistakes.
I've made no mistakes.
- In your rush to glory, you assumed that the pace of the game revolved around your actions. Can you even fathom how preposterous that sounds to a being like me? A being that if so inclined could cause your own insignificant thoughts to crush the peanut sized mass of grey matter floating within your skull.
![]() You have lost your mind, Nefarius. You speak in riddles.
You have lost your mind, Nefarius. You speak in riddles.
- It's simple really. Allow me to summarize...
![]() Please do.
Please do.
- In this world where time is your enemy, it is my greatest ally. This grand game of life that you think you play in fact plays you. To that I say...
- Let the games begin!
- Landing
- Well done, my minions. The mortals' courage begins to wane! Now, let's see how they contend with the true Lord of Blackrock Spire!!!
- Shadowflame
- BURN! You wretches! BURN!
- Class call out
- Death Knights, get over here!
- Demon hunters? How odd, covering your eyes like that. Doesn't it make it hard to see the world around you?
- Druids and your silly shapeshifting. Let's see it in action!
- Evokers, nothing more than pitiful whelps. No wonder my father abandoned your experiment.
- Hunters and your annoying pea-shooters!
- Mages too? You should be more careful when you play with magic...
- Monks, doesn't all that rolling make you dizzy?
- Paladins, I've heard you have many lives. Show me.
- Priests! If you're going to keep healing like that, we might as well make it a little more interesting!
- Rogues? Stop hiding and face me!
- Shamans, show me what your totems can do!
- Warlocks, you shouldn't be playing with magic you don't understand. See what happens?
- Warriors, I know you can hit harder than that! Let's see it!
- Summoning skeletons (at 20%)
- Impossible! Rise my minions! Serve your master once more!
- 5% HP
- ENOUGH! Now you vermin shall feel the force of my birthright: The Fury of the Earth itself!
- Killing a player
- Worthless wretch! Your friends will join you soon enough!
- Death
- This cannot be! I am the master here! You mortals are nothing to my kind! Do you hear me? Nothing!
Notes
- Nefarian's voice is believed to be that of Chris Metzen.[2]
- Up until the introduction of the 40-man Temple of Ahn'Qiraj instance in early 2006, Nefarian was considered by players to be one of the most difficult of all boss encounters. Even then, downing Nefarian was still a significant achievement for guilds pursuing end-game content.
- The world first kill was claimed by Drama, an Alliance guild of Shattered Hand US at the time of the kill, now currently resides on Korgath US.
Patch changes
Retail
-
 Patch 10.0.0 (2022-10-25): Class call for Evokers added.
 -
 Hotfix (2018-01-26): Addressed an issue where the Drakonid would fail to spawn as expected.
 - Patch 7.0.3 (2016-07-19): Class call for demon hunters added.
-
 Patch 5.0.4 (2012-08-28): Class call for monks added.
 -
 Patch 3.3.0 (2009-12-08): Obtaining a tier 2 helmet from Nefarian will no longer grant the [Onyxia's Lair (Level 60)] feat of strength.
 - Patch 3.2.2 (2009-09-22): Tier 2 helms moved from classic Onyxia's to Nefarian's loot table.
- Patch 3.0.2 (2008-10-14): Class call for death knights added.
-
 Patch 1.9.0 (2006-01-03): Fixed a bug that allowed pets to be targeted by "Wild Polymorph" during the Nefarian encounter.
 - Patch 1.8.0 (2005-10-10): Fixed a bug that caused people to fall out of Blackwing Lair during the Nefarian fight.
- Hotfix (2005-09-28): You should no longer be able to stand on various parts of the geometry and cause the Drakonids, Nefarian or the skeletons to go into evade mode.
- Patch 1.6.0 (2005-07-12): Added.
Classic
- Patch 1.13.4 (2020-03-10): Fixed an issue that could cause Nefarian to momentarily fly away after revealing his true from at the beginning of Phase 2 of his encounter.
Video
References
- ^
 Bornakk 2009-09-25. Re: T2 helms post-3.2.2. Archived from the original on 2009-09-25. Retrieved on 2009-09-25.
- ^ http://www.nytimes.com/2006/05/09/technology/10warcraftqa.web.html?pagewanted=4&_r=5
External links
| |||||||||||||||||||||||||||||||||||
