WardsJames (talk | contribs) mNo edit summary Tag: Source edit |
|||
| (130 intermediate revisions by 41 users not shown) | |||
| Line 1: | Line 1: | ||
| ⚫ | |||
| − | {{WoD}} |
||
| ⚫ | |||
{{Infobox zone |
{{Infobox zone |
||
|faction = Alliance |
|faction = Alliance |
||
|name = Shadowmoon Valley |
|name = Shadowmoon Valley |
||
| − | |level = |
+ | |level = 10 - 50 |
| battlelvl = 23 - 25 |
| battlelvl = 23 - 25 |
||
| − | |ss = |
+ | |ss = Shadowmoon WoD preview.jpg |
|caption = Concept art of Draenor's Shadowmoon Valley. |
|caption = Concept art of Draenor's Shadowmoon Valley. |
||
|capital = {{Alliance }} [[Karabor]] |
|capital = {{Alliance }} [[Karabor]] |
||
| − | |races = {{Race| |
+ | |races = {{Race|Mag'har|[[Orc]]}}<br/> {{Race|Draenei}}<br/>{{RaceIcon|Botani}} [[Botani]]<br/>{{RaceIcon|FungalGiant}} [[Fungal giant]]<br/>{{RaceIcon|Podling}} [[Podling]]<br/>{{RaceIcon|Goren}} [[Goren]]<br/>{{Race|Naaru}}<br/>{{RaceIcon|Pale}} [[Pale orc]]<br/>{{Race|NightElf}}<br/>{{Race|Goblin}}<br/>{{Race|Human}}<br/>{{Race|Worgen}}<br/>{{Race|Dwarf}}<br/>{{Race|Gnome}}<br/> |
|government = Theocracy<br/> Tribal chiefdom |
|government = Theocracy<br/> Tribal chiefdom |
||
| − | |rulers = {{Alliance}} {{ |
+ | |rulers = {{Alliance}} {{Race|draenei|notext}} [[Council of Exarchs]] |
| + | |frulers = {{Alliance}} {{RaceIcon|Velen}} {{Au|Velen|Prophet Velen}}{{KIA}}<br/> |
||
| − | |major = {{Neutral}} [[Shadowmoon Burial Grounds]]<br/> {{Neutral}} [[Anguish Fortress]]<br/>{{Alliance}} [[Lunarfall]]<br/>{{Alliance}} [[Embaari Village]]<br/>{{Alliance}} [[Elodor]] |
||
| + | [[File:Iron Horde Emblem.png|15px]] {{RaceIcon|Ner'zhul2}} {{Au|Ner'zhul}}{{KIA}} |
||
| − | |minor = {{Neutral}} [[Shaz'gul]]<br />{{Neutral}} [[Groomshade Grove]]<br />{{Alliance}} [[Teluuna Observatory]] |
||
| + | |major = [[File:Iron Horde Emblem.png|15px]] [[Anguish Fortress]] ([[Shadowmoon Burial Grounds]])<br/>{{Alliance}} [[Lunarfall]]<br/>{{Alliance}} [[Embaari Village]]<br/>{{Alliance}} [[Elodor]]<br/>[[File:Iron Horde Emblem.png|15px]] [[Shaz'gul]]<br/>{{Neutral}} [[Gul'var]] |
||
| ⚫ | |||
| + | |minor = <br />{{Neutral}} [[Gloomshade Grove]]<br/>{{Alliance}} [[Teluuna Observatory]]<br/>{{Alliance}} [[Twilight Glade]]<br/>[[File:Iron Horde Emblem.png|15px]] [[Darktide Roost]] |
||
| ⚫ | |||
| ⚫ | |||
| ⚫ | |||
|resources = |
|resources = |
||
| − | |affiliation = [[Alliance]] |
+ | |affiliation = [[Alliance]], {{Au|Shadowmoon clan}}, [[Iron Horde]] |
|territory = Contested |
|territory = Contested |
||
| − | |loc = Southeastern |
+ | |loc = Southeastern {{Au|Draenor}} |
| − | |source = ''[[World of Warcraft: Warlords of Draenor]]'' |
||
}} |
}} |
||
| ⚫ | {{QuoteWiki|Hidden under a shroud of perpetual night broken only by bright starlight, the lush, idyllic forests of Shadowmoon Valley are home to a majestic draenei tomb and sanctuary: Karabor. While many of Shadowmoon’s denizens study prophecy among Karabor’s ancient stone circles, plotters with darker ambitions lurk in the valley’s vast underground cave network, gazing greedily at the sacred temple.|[http://eu.battle.net/wow/en/warlords-of-draenor/ Official Site - Warlords of Draenor]}} |
||
| + | {{QuoteWiki|In moments of great strife, I gaze into the heavens and see just how far we have already come.|{{Au|Velen|The Prophet Velen}}<ref>''[[The Art of World of Warcraft: Warlords of Draenor]]'', pg. 43</ref>}} |
||
| ⚫ | |||
| − | '''Shadowmoon Valley''' is a [[zone]] in south-eastern |
+ | '''Shadowmoon Valley''' is a [[zone]] in south-eastern {{Au|Draenor}}. A lush valley engulfed in eternal night, the [[Pale Lady]] shines so brightly here that it even replaced the sun as the valley's primary light source during the day. Shadowmoon serves as one of the key centers of draenei civilization on the world of Draenor, its heart being the sacred temple of [[Karabor]]. Lately, the Iron Horde began advancing on the draenei settlements through the {{Au|Shadowmoon clan}} and naval attacks targeting Karabor itself. |
| − | The Alliance expedition arrives in the zone after the completion of the [[Assault on the Dark Portal|introductory mission]] in [[Tanaan Jungle]], which involves the |
+ | The Alliance expedition arrives in the zone after the completion of the [[Assault on the Dark Portal|introductory mission]] in [[Tanaan Jungle]], which involves the destruction of the [[Dark Portal]]. |
==Introduction== |
==Introduction== |
||
| Line 37: | Line 38: | ||
Not all orcs share the Shadowmoon clan's fascination with void magics, though. The [[Shadowmoon Exiles]] have split from the Shadowmoon clan, seeking a peaceful life for themselves and trying to co-operate with the draenei and recently arrived Alliance forces, even if it means killing their former tribesmen in order to prevent greater bloodshed. |
Not all orcs share the Shadowmoon clan's fascination with void magics, though. The [[Shadowmoon Exiles]] have split from the Shadowmoon clan, seeking a peaceful life for themselves and trying to co-operate with the draenei and recently arrived Alliance forces, even if it means killing their former tribesmen in order to prevent greater bloodshed. |
||
| − | |||
<!-- |
<!-- |
||
==History== |
==History== |
||
[[File:Stub.png|20px]] ''Please add any available information to this section.'' |
[[File:Stub.png|20px]] ''Please add any available information to this section.'' |
||
| − | |||
==Getting There== |
==Getting There== |
||
[[File:Stub.png|20px]] ''Please add any available information to this section.'' |
[[File:Stub.png|20px]] ''Please add any available information to this section.'' |
||
--> |
--> |
||
| − | |||
==Geography== |
==Geography== |
||
<!-- |
<!-- |
||
| Line 51: | Line 49: | ||
--> |
--> |
||
===Maps and subregions=== |
===Maps and subregions=== |
||
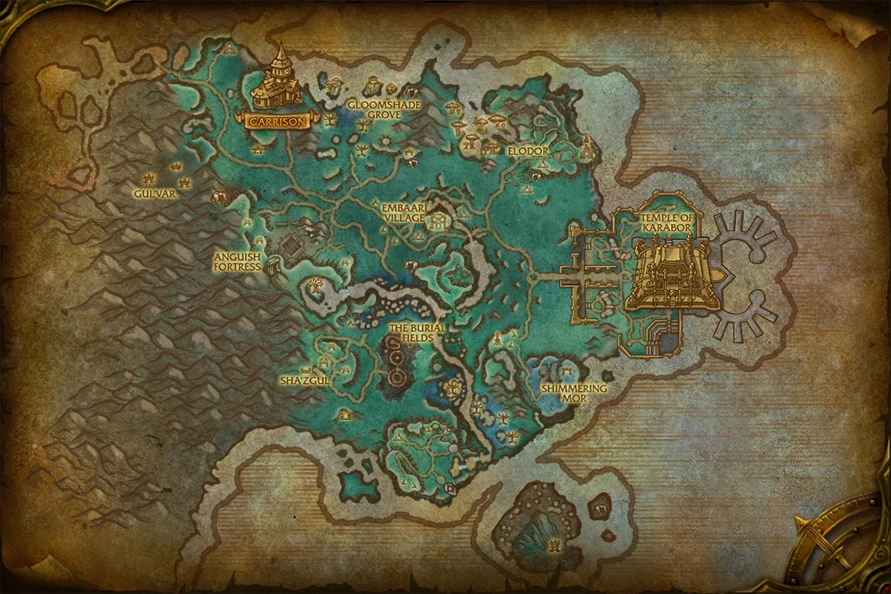
| − | [[File:VZ-Shadowmoon Valley ( |
+ | [[File:VZ-Shadowmoon Valley (alternate universe).jpg|thumb|left|Map of Shadowmoon Valley, Horde point of view (Alliance's PoV until unlocking the Garrison).]] |
| ⚫ | |||
| − | |||
| + | |- |
||
| ⚫ | |||
| |
| |
||
*[[Anguish Fortress]] |
*[[Anguish Fortress]] |
||
| − | *[[ |
+ | **[[Ancestor's Grotto]] |
| ⚫ | |||
| + | **[[Terrace of the Stars]] |
||
| + | **[[Shadowmoon Burial Grounds]] |
||
| + | *[[Arbor Glen]] |
||
*[[Barrier Sea]] |
*[[Barrier Sea]] |
||
*[[Black Altar of Xan'tish]] |
*[[Black Altar of Xan'tish]] |
||
| Line 63: | Line 65: | ||
*[[Burial Fields|The Burial Fields]] |
*[[Burial Fields|The Burial Fields]] |
||
*[[Cursed Woods|The Cursed Woods]] |
*[[Cursed Woods|The Cursed Woods]] |
||
| − | *[[ |
+ | **[[Watcher's Den]] |
| − | *[[ |
+ | *[[Den of Secrets]] |
*[[Draakorium|The Draakorium]] |
*[[Draakorium|The Draakorium]] |
||
**[[Crescent Hearth|The Crescent Hearth]] |
**[[Crescent Hearth|The Crescent Hearth]] |
||
*[[Drybone Hollow]] |
*[[Drybone Hollow]] |
||
*[[Dyvari Overgrowth]] |
*[[Dyvari Overgrowth]] |
||
| − | **[[Blademoon |
+ | **[[Blademoon Bloom]] |
*[[Elodor]] |
*[[Elodor]] |
||
| − | ** |
+ | **{{Au|Altar of Sha'tar}} |
**[[Elodor Dig]] |
**[[Elodor Dig]] |
||
**[[Elodor Fields]] |
**[[Elodor Fields]] |
||
| Line 81: | Line 83: | ||
**[[Lamplighter Inn]] |
**[[Lamplighter Inn]] |
||
*[[Evanescent Sea|The Evanescent Sea]] |
*[[Evanescent Sea|The Evanescent Sea]] |
||
| + | **[[Darktide Roost]] |
||
| + | **[[Darktide Strait]] |
||
**[[Isle of Shadows]] |
**[[Isle of Shadows]] |
||
*[[Eventide Landing]] |
*[[Eventide Landing]] |
||
| + | **[[Paletide Den]] |
||
*[[Forgotten Shore]] |
*[[Forgotten Shore]] |
||
| ⚫ | |||
*[[Gloomshade Grove]] |
*[[Gloomshade Grove]] |
||
**[[Gloomshade Grotto]] |
**[[Gloomshade Grotto]] |
||
| + | *[[Great Tree Valuundira]] |
||
| ⚫ | |||
*[[Gul'var]] |
*[[Gul'var]] |
||
**[[Shadow Rise|The Shadow Rise]] |
**[[Shadow Rise|The Shadow Rise]] |
||
| Line 99: | Line 103: | ||
**[[Tranquil Court]] |
**[[Tranquil Court]] |
||
*[[Light's Fall]] |
*[[Light's Fall]] |
||
| − | * |
+ | *{{Alliance}} [[Lunarfall]] |
| + | **[[Lunarfall Shipyard]] |
||
*[[Moonflower Valley]] |
*[[Moonflower Valley]] |
||
*[[Moonlit Shore]] |
*[[Moonlit Shore]] |
||
| Line 109: | Line 114: | ||
*[[Nightmarsh|The Nightmarsh]] |
*[[Nightmarsh|The Nightmarsh]] |
||
**[[Twilight Glade]] |
**[[Twilight Glade]] |
||
| + | **[[Vile Cavern]] |
||
*[[Plains of Serenity]] |
*[[Plains of Serenity]] |
||
*[[Saraah's Vale]] |
*[[Saraah's Vale]] |
||
*[[Secluded Glade]] |
*[[Secluded Glade]] |
||
| + | *[[Shadowmoon Rise]] |
||
*[[Shaz'gul]] |
*[[Shaz'gul]] |
||
| − | *[[ |
+ | *[[Shimmer Moor|The Shimmer Moor]] |
*[[Socrethar's Rise]] |
*[[Socrethar's Rise]] |
||
| + | **[[Shrine of Othaar]] |
||
| ⚫ | |||
| + | *[[Spirit Whisper Hollow]] |
||
*[[Starfall Outpost]] |
*[[Starfall Outpost]] |
||
*[[Swamplight Trail]] |
*[[Swamplight Trail]] |
||
| + | **[[Swamplight Cave]] |
||
*[[Tanaan Channel]] |
*[[Tanaan Channel]] |
||
| + | **[[Eventide Bay]] |
||
| ⚫ | |||
*[[Teluuna Observatory]] |
*[[Teluuna Observatory]] |
||
*[[Umbrafen]] |
*[[Umbrafen]] |
||
| Line 123: | Line 136: | ||
*[[Verdant Mire|The Verdant Mire]] |
*[[Verdant Mire|The Verdant Mire]] |
||
*[[Waning Crescent]] |
*[[Waning Crescent]] |
||
| + | |- |
||
| + | || |
||
| + | ---- |
||
| + | ;[[Removed location]]s |
||
| + | *[[Akama's Scar]] |
||
| + | *[[Gar'mak Quarry]] |
||
| + | *[[Grommar]] |
||
| + | *[[Iron March]] |
||
| + | *[[Pilgrim's Sojourn]] |
||
| + | *[[Shadowmoon Overlook]] |
||
|} |
|} |
||
| − | {{ |
+ | {{clear|left}} |
| + | |||
| + | <gallery> |
||
| + | VZ-Shadowmoon Valley (alternate universe)-t1.jpg|Map of Shadowmoon Valley, Alliance unlocked Garrison. |
||
| + | VZ-Shadowmoon Valley (alternate universe)-t2.jpg|Map of Shadowmoon Valley, Alliance unlocked Shipyard. |
||
| + | </gallery> |
||
| − | === |
+ | ===Instances=== |
{| class="darktable zebra" |
{| class="darktable zebra" |
||
!Instance name |
!Instance name |
||
| Line 155: | Line 183: | ||
==Notable characters== |
==Notable characters== |
||
| − | {{Main|Shadowmoon Valley |
+ | {{Main|Shadowmoon Valley (alternate universe) NPCs}} |
| + | *{{NPC|Alliance|Exarch Akama|icon=Draenei Male}} |
||
| − | |||
| − | *{{NPC|Alliance| |
+ | *{{NPC|Alliance|Exarch Maladaar (alternate universe)||Exarch Maladaar|icon=Draenei Male}} |
| − | *{{NPC|Alliance| |
+ | *{{NPC|Alliance|Exarch Naielle (alternate universe)||Exarch Naielle|icon=Draenei Female}} |
| − | *{{NPC|Alliance|Exarch |
+ | *{{NPC|Alliance|Exarch Othaar||Exarch Othaar|icon=Draenei Male}} |
| − | *{{NPC|Alliance| |
+ | *{{NPC|Alliance|Velen (alternate universe)||Velen|icon=Velen}} |
| − | *{{NPC|Alliance| |
+ | *{{NPC|Alliance|Vindicator Maraad|icon=Maraad}} |
| − | *{{NPC| |
+ | *{{NPC|Alliance|Yrel|icon=Yrel}} |
| − | *{{NPC| |
+ | *{{NPC|Hostile|Ner'zhul (alternate universe)||Ner'zhul|icon=Ner'zhul2}} |
| − | *{{NPC| |
+ | *{{NPC|Neutral|Cordana Felsong|icon=Warden}} |
| − | *{{NPC| |
+ | *{{NPC|Neutral|Khadgar|icon=Khadgar}} |
| + | *{{NPC|Neutral|Rexxar (alternate universe)||Rexxar|icon=Rexxar}} |
||
==Quests== |
==Quests== |
||
| − | [[File:Shadowmoon_WoD.jpg|thumb|300px|Shadowmoon |
+ | [[File:Shadowmoon_WoD.jpg|thumb|300px|Shadowmoon clan's settlement.]] |
| − | {{Main|Shadowmoon Valley storyline}} |
+ | {{Main|Shadowmoon Valley (alternate universe) storyline}} |
| + | ===Chapter 1: Establishing a Foothold=== |
||
| − | '''This section contains spoilers.''' If you want to experience this story on your own, do not read this section. |
||
| + | {{Previous story|[[Yrel]] and [[Maraad]]|the [[Assault on the Dark Portal]] scenario}} |
||
| ⚫ | After landing on the shores of [[Shadowmoon Valley]], the champion, [[Khadgar]], {{Au|Exarch Maladaar}}, [[Vindicator Maraad]], [[Yrel]] and the [[Draenei]] rescued from the {{Au|Bleeding Hollow clan|Bleeding Hollow}} were greeted by {{Au|Velen}}, who was eager for allies against the [[Iron Horde]].<ref>[[Finding a Foothold]]</ref> Velen led the champion to the {{Au|Shadowmoon clan|Shadowmoon}} ruins of [[Lunarfall]], a commanding position at which the Alliance might build a base. Khadgar opened a portal to [[Stormwind]] for reinforcements and supplies and through it came a small army of footmen and peasants ready to break ground.<ref>[[For the Alliance! (quest)]]</ref> Construction was briefly interrupted by attacks by local fauna, but the champion subdued the local wildlife<ref>[[Ravenous Ravens]]</ref><ref>[[Quakefist (quest)]]</ref> and the garrison was completed.<ref>[[Establish Your Garrison (Alliance)]]</ref> |
||
| − | === |
+ | ===Chapter 2: Shadows Awaken=== |
| ⚫ | With the garrison constructed, Yrel asked the champion to accompany her back to her home of [[Embaari Village]]. When they arrived, Yrel introduced the champion to her sister [[Samaara]], who was overjoyed and a little surprised to see her younger sister was still alive.<ref>[[A Hero's Welcome (quest)]]</ref> However, they learned that the nearby village of [[Arbor Glen]] was under siege by the {{Au|Shadowmoon clan|Shadowmoon}}. The champion left to stop the invasion<ref>[[Closing the Door]]</ref> and rescue survivors,<ref>[[Think of the Children!]]</ref> joining with Velen and Yrel to confront {{Au|Ner'zhul}} at the [[Teluuna Observatory]]. Ner'zhul kidnapped Samaara and summoned the void lord [[Karnoth]] to distract the champion while he made his escape.<ref>[[Shadows Awaken]]</ref> |
||
| ⚫ | After landing on the shores of [[Shadowmoon Valley]], the champion, [[Khadgar]], |
||
| ⚫ | |||
| − | ===Shadows Awaken=== |
||
| ⚫ | The champion, Velen and Yrel traveled to [[Twilight Glade]], a village near the Shadowmoon capital of [[Shaz'gul]]. In spite of Yrel's doubts, Velen placed Yrel in charge of the [[Rangari]] of the area with orders to sabotage the Shadowmoon camp and rescue the captives.<ref>[[Into Twilight]]</ref> While Yrel and the Rangari performed reconnaissance on Shaz'gul, Velen prepared a prophetic elixir to peer into the future of [[Karabor]] with the champion's assistance.<ref>[[The Clarity Elixir]]</ref> In their shared vision, Velen and the champion saw the Dark Star, a [[naaru]] allied with the Iron Horde rain destruction upon Karabor as an endless stream of Iron Horde soldiers invaded the city and slaughtered its defenders. Velen and the champion both resolved to prevent this catastrophe, and the champion left to assist Yrel with the infiltration of Shaz'gul while Velen contemplated their next move.<ref>[[The Fate of Karabor]]</ref> |
||
| ⚫ | With the garrison constructed, Yrel asked the champion to accompany her back to her home of [[Embaari Village]]. When they arrived, Yrel introduced the champion to her sister [[Samaara]], who was |
||
| ⚫ | Yrel and the champion disguised themselves as Shadowmoon orcs and infiltrated Shaz'gul. The champion placed explosives in key locations around the city and attempted to rescue the captive draenei, but the captives had already been moved to [[Anguish Fortress]] before they arrived.<ref>[[Going Undercover]]</ref> The failure to rescue the captives hit Yrel particularly hard, and it was only the depth of the champion's experiences on Azeroth that gave her the courage to detonate the bombs. Their cover blown, the champion and Yrel then fled the ruined city for Twilight Glade.<ref>[[Escape From Shaz'gul]]</ref> |
||
| ⚫ | |||
| ⚫ | The champion, Velen and Yrel traveled to [[Twilight Glade]], a village near the Shadowmoon capital of [[Shaz'gul]]. In spite of Yrel's doubts, Velen placed Yrel in charge of the [[Rangari]] of the area with orders to sabotage the Shadowmoon camp and rescue the captives. While Yrel and the Rangari performed reconnaissance on Shaz'gul, Velen prepared a prophetic elixir to peer into the future of [[Karabor]] with the champion's assistance. In their shared vision, Velen and the champion saw the Dark Star, a [[ |
||
| ⚫ | When Yrel and the champion returned, Velen informed them that they were going to seek the help of {{Au|Rulkan}} and the other exiles of the Shadowmoon. The champion traveled to [[Exile's Rise]] on Velen's behalf.<ref>[[Chasing Shadows]]</ref> When the champion arrived, Rulkan explained that Ner'zhul seeks the power of the Dark Star because {{Au|Grommash Hellscream}} had threatened to wipe the Shadowmoon out if they didn't join the Iron Horde. The Shadowmoon were a simple and spiritual tribe of nomads that did not have anything to contribute to the Horde in martial might or weaponry, so Ner'zhul opted to offer the only thing they had: magic. He led the Shadowmoon away from their ancestor worship and into necromancy and dark magic, violating all of the Shadowmoon's ancient taboos to prove his loyalty to the Iron Horde and stay the wrath of the Warchief. Rulkan than gave the champion her keystone to open the entrance to Anguish Fortress.<ref>[[Ancestor's Memory]]</ref> |
||
| ⚫ | Yrel and the champion disguised themselves as Shadowmoon orcs and infiltrated Shaz'gul. The champion placed explosives in key locations around the city and attempted to rescue the captive draenei, but the captives had already been moved to [[Anguish Fortress]] before they arrived. The failure to rescue the captives hit Yrel particularly hard, and it was only the depth of the champion's experiences on Azeroth that gave her the courage to detonate the bombs. Their cover blown, the champion and Yrel then fled the ruined city for Twilight Glade. |
||
| ⚫ | The champion led the attack on Anguish Fortress, using the keystone to disable its magical barrier from the inside,<ref>[[Into Anguish]]</ref> defeating the void creatures the Shadowmoon had summoned with the souls of their ancestors and the captured Draenei<ref>[[Harbingers of the Void]]</ref> and rescuing the draenei captives that had not been sacrificed yet.<ref>[[The Great Salvation]]</ref> However, Samaara was not among the rescued captives. With the defenses disabled, Yrel and Velen joined the champion to confront Ner'zhul at the [[Terrace of the Stars]]. Before they could act, Ner'zhul sacrificed Samaara to summon the void lord [[Arkeddon]] to demonstrate to Grom Hellscream what the Dark Star was capable of. Ner'zhul and Grom left to begin their preparations for the invasion of Karabor while the champion, Yrel and Velen destroyed Arkeddon. After Arkeddon was defeated, Samaara lay dying at the ritual altar. As Samaara died in her arms, Yrel resolved to work with the champion destroy the Iron Horde.<ref>[[The Dark Side of the Moon]]</ref> |
||
| ⚫ | When Yrel and the champion returned, Velen informed them that they were going to seek the help of |
||
| + | ===Chapter 4: The Light Prevails=== |
||
| ⚫ | The champion led the attack on Anguish Fortress, using the keystone to disable its magical barrier from the inside, defeating the void creatures the Shadowmoon had summoned with the souls of their ancestors and the captured Draenei and rescuing the draenei captives that had not been sacrificed yet. However, Samaara was not among the rescued captives. With the defenses disabled, Yrel and Velen joined the champion to confront Ner'zhul at the [[Terrace of the Stars]]. Before they could act, Ner'zhul sacrificed Samaara to summon the void lord [[Arkeddon]] to demonstrate to Grom Hellscream what the Dark Star was capable of. Ner'zhul and Grom left to begin their preparations for the invasion of Karabor while the champion, Yrel and Velen destroyed Arkeddon. |
||
| + | With Ner'zhul beginning the ritual to control the Dark Star at [[Light's Fall]], Velen sent the champion ahead to delay the ritual long enough for him to prepare to stop it. The champion confronted and fought Ner'zhul at Light's Fall. As Ner'zhul began to weaken, Velen arrived and told Ner'zhul that he could still turn from the path of destruction and that the draenei would protect him. Ner'zhul refused, saying that he could no longer redeem himself. Ner'zhul then summoned a [[Void Horror]] in a last ditch effort to forestall the champion. The void beast bought Ner'zhul the time he needed to complete the ritual and Ner'zhul summoned the Dark Star in triumph. With the knowledge of what the Dark Star would do to Karabor if left unchecked, Velen knew must be done. He gravely looked at Yrel and passed her the prophetic sigil he bore, anointing her the leader of the draenei and sacrificed himself to restore the Light in the naaru and defeat the Dark Star.<ref>[[Darkness Falls]]</ref> |
||
| + | While Ner'zhul's plan was thwarted, Maraad arrived with grave news—Karabor's defense crystal had fallen. Maraad urged Yrel and the champion to gather up the draenei survivors and flee. Yrel refused, resolving that Velen's sacrifice would be in vain if Karabor fell anyway. She and the champion gathered up the survivors and departed to Karabor to break the siege. On wings of [[fey dragon]]s, Yrel, Maraad and the champion broke the siege at Karabor's gates and fought through the city until they reached the docks.<ref>[[The Righteous March]]</ref> |
||
| − | After Arkeddon was defeated, Samaara lay dying at the ritual altar. As Samaara died in her arms, Yrel resolved to work with the champion destroy the Iron Horde. |
||
| + | Thanks to Velen's sacrifice at Light's Fall, the naaru that was the Dark Star, {{Au|K'ara}} was on the other side of the battle from the vision at Twilight Glade. The champion and Yrel protected K'ara while he prepared a devastating counterattack. [[Commander Vorka]] himself attacked K'ara to stop her, but the champion and Yrel overcame his assault. With the Iron Horde's forces breaking, K'ara unleased the Light upon the Iron Fleet in the harbor, sinking their ships and vanquishing the remaining assault.<ref>[[The Defense of Karabor]]</ref> |
||
| ⚫ | |||
| ⚫ | |||
| + | After resting from their victory, Yrel mailed the champion [[The Prophet's Arcanum]], which the champion used at Karabor to receive a message from Velen. Velen's memories told the champion that Dark Star was in fact K'ara, ejected from the [[Genedar]] when it crashed upon Draenor. Velen had kept this a secret, worried what the knowledge might do in the wrong hands. Ner'zhul and the Shadowmoon had independently discovered this, and Velen needed to give his life—his Light—to redeem K'ara and stop Ner'zhul. |
||
| ⚫ | Continuing the tradition started on the [[Timeless Isle]], Shadowmoon Valley has a huge number of [[vignette]]s, which are one-time events like killing rare mobs, looting treasure chests, or completing scripted events. Nearly all of the vignettes reward [[Garrison Resources]] in addition to an uncommon or rare-quality item. |
||
| + | {{Next story|[[Yrel]] and [[Maraad]]|We Need an Outpost|[[Gorgrond]]}} |
||
| − | + | ===Dungeon: Shadowmoon Burial Grounds=== |
|
| + | {{main|Shadowmoon Burial Grounds}} |
||
| + | |||
| + | Though they were defeated in the [[Defense of Karabor]], Ner'zhul and his closest allies retreated deeper into the Anguish Fortress to revive the souls of the dead and attack Karabor again. The champions of the Alliance and Horde invaded and defeated Ner'zhul and his lieutenants, ending the Shadowmoon threat once and for all. |
||
| + | |||
| + | ===Sidestory: The Pursuit of Justice=== |
||
| + | {{Previous story|{{Au|Exarch Maladaar}}|the [[Assault on the Dark Portal]] scenario}} |
||
| + | With their garrison built, the Alliance champion and Vindicator Maraad quickly realized that garrison's ever-growing army was going to quickly run out of food. Maraad contacted [[Exarch Akama]] in [[Elodor]] about sharing in their harvest. Akama agreed, provided that the champion supply additional labor to help with the harvest. A caravan led by [[Foreman Zipfizzle]] set off to Elodor with labor and plans to return with food.<ref>[[Migrant Workers]]</ref> |
||
| + | |||
| + | The champion and most of the caravan arrived in Elodor unscathed, but the wagon Maraad was riding in fell behind. When it didn't turn up with the rest, the champion and Akama went back across the plain to find it. When they found it, they learned the Shadowmoon had ambushed them. The farmers were panicked, but Akama encouraged them to stand their ground, as even a sickle is a powerful weapon when wielded with the force of the [[Light]] behind it. The Shadowmoon repeatedly attacked as the champion, Akama, Maraad and the farmers made the rest of the way to Elodor, but there were no casualties of the champion's company.<ref>[[Circle the Wagon]]</ref> |
||
| + | |||
| + | After arriving in Elodor, Akama and Maraad left to meet the [[Council of Exarchs]] while the champion was introduced to Exarch Hataaru and helped him repair Elodor's defense crystal.<ref>[[Invisible Ramparts]]</ref> A brief attack by the Shadowmoon followed, which the champion and the Elodor defenders quickly repelled. While the defense crystal was proven fully operational, the alien technology agitated the local fungi and an [[Enraged Fungal Giant]] attacked it shortly after the Shadowmoon retreated.<ref>[[Defenstrations]]</ref> After the champion and Elodor defenders subdued it, the champion was brought to the Council by Maraad. The Exarchs greeted the champion genially but cautiously.<ref>[[The Exarch Council]]</ref> The champion resolved to win the trust of the Exarchs by assisting them with their own pressing concerns—Exarch Hataaru with a malfunctioning crystal in the [[Elodor Dig]]<ref>[[Shut 'er Down]]</ref> and {{Au|Exarch Naielle}} with a poisonous spore population in the [[Umbrafen]].<ref>[[Fun with Fungus]]</ref> |
||
| + | |||
| + | When the champion returned to the council, however, they found Maladaar had gone missing.<ref>[[Exarch Maladaar (quest)]]</ref> When the champion found Malaadar, he said that he was worried that the [[Burning Legion]] had infiltrated the city. With Maladaar's help, the champion tracked down a Legion hideout in a cave under the city and killed a demon that was hiding there.<ref>[[Trust No One (quest)]]</ref> When the champion went to the Council to report what they had discovered they found Exarch Hataaru dead.<ref>[[Warning the Exarchs]]</ref> Maladaar took investigating Hataaru's assassination into his own hands and with the help of [[Soulbinder Nyami]] was able to commune with Hataaru's spirit. Maladaar asked why Hataaru was killed and Hataaru said it was under an Exarch's orders. When Maladaar asked Hataaru who had him killed, Hataaru's spirit pointed at Nyami and Nyami abruptly ended the ritual, saying that his spirit was in great agony.<ref>[[Speaker for the Dead (Shadowmoon Valley)]]</ref> |
||
| + | |||
| + | Maladaar provided the champion with a device to install upon [[Exarch's Rise]] to reveal the traitor. When the champion used the device, it revealed that [[Exarch Othaar]] was the traitor. Othaar had taken a new name as a [[man'ari]]--Socrethar and fought the champion until he became weak and retreated.<ref>[[The Traitor's True Name]]</ref> For the champion's efforts on their behalf, the Council resolved to support the Alliance fully<ref>[[Supply Drop]]</ref> and permitted the champion to hire a follower from Elodor for their garrison to serve as their ambassador.<ref>[[Friend of the Exarchs]]</ref> |
||
| + | {{Next story|{{Au|Exarch Maladaar}} and [[Soulbinder Nyami]]|In the Shadows of Auchindoun|[[Talador]]}} |
||
| + | |||
| + | ===Sidestory: Gloomshade Grove=== |
||
| + | [[Ken Loggin]] informed the champion that [[Shelly Hamby]] and her crew of lumberjacks traveled to [[Gloomshade Grove]] to harvest lumber but haven't returned in several days. The champion decided to investigate. Outside the grove, the champion found a pack mule used by the crew that was suspiciously unattended.<ref>[[Lost Lumberjacks]]</ref> After entering the grove, the champion met a [[podling]] named [[Phlox]] who helped the champion follow a trail of clues to a grotto along the beach. Here, Phlox revealed that he had captured the lumberjacks and attempted to kill the champion. Phlox was easily overcome, and the champion found [[Jarrod Hamby]] dying in the cave behind where Phlox attacked them.<ref>[[Gloomshade Grove (quest)]]</ref> |
||
| + | |||
| + | Jarrod explained to the champion that the podlings ate [[Ryan Metcalf (NPC)|Ryan Metcalf]] and that he was mortally wounded himself. Jarrod died, asking the champion to kill the podling king, [[King Deathbloom|Deathbloom]]. The champion killed many of podlings in vengeance for their murdered peasants and assassinated Deathbloom at his lair.<ref>[[Game of Thorns]]</ref> The champion found Shelly Hamby bound in vines nearby. After releasing her, Shelly broke down about her husband's murder and swore to serve the champion as a follower as long as she gets to kill as many podlings as possible.<ref>[[Shelly Hamby (quest)]]</ref> |
||
| + | |||
| + | ===Sidestory: Purifying the Gene Pool=== |
||
| + | The champion was asked by [[Farmer Gehaar]] at the [[Teluuna Observatory]] to visit the [[Draakorium]] to investigate the recent aggressive activities of the [[Botani]] in the Southern region of the valley. Upon arriving there, the champion met with [[Prelate Reenu]] who sent them into the bog to investigate a caravan that had been recently attacked. The champion found [[Fiona]]'s caravan at the entrance to the bog and [[Gidwin Goldbraids]] poisoned by local flora.<ref>[[Crippled Caravan]]</ref> The champion collected local herbs and chemicals and helped Fiona prepare a remedy for the poison.<ref>[[Fiona's Solution]]</ref><ref>[[Swamplighter Queen (quest)]]</ref><ref>[[Cooking With Unstable Herbs]]</ref> |
||
| + | |||
| + | With Gidwin cured, the champion and [[Rangari Arepheon]] ventured deeper into the bog to determine why the Botani had become more aggressive lately.<ref>[[Blademoon Bloom (quest)]]</ref> They found an immature [[genesaur]] growing deep in the grove—the Botani were collecting corpses to help it grow. The champion and Arepheon then slew the genesaur before it could mature to stop the attacks.<ref>[[Gestating Genesaur]]</ref> Fiona, again impressed with the champion's capabilities and thankful for the assistance in saving Gidwin, joined the champion as a follower.<ref>[[Fiona (quest)]]</ref> |
||
| + | |||
| + | ===Sidestory: On the Shadow's Trail=== |
||
| + | {{Previous story|[[Khadgar]] and [[Cordana Felsong]]|the [[Assault on the Dark Portal]] scenario}} |
||
| + | |||
| + | After the events in [[Gorgrond]], [[Cordana Felsong]] delivered the champion a request to meet [[Khadgar]] at his own camp at the [[Starfall Outpost]].<ref>[[Meet Us at Starfall Outpost]]</ref> Khadgar has tracked {{Au|Gul'dan}}'s {{Au|Shadow Council}} to the nearby village of [[Gul'var]] and tasks the champion and Cordana with capturing an [[observer]] from the village that they can use to spy on the warlocks.<ref>[[Catching His Eye]]</ref> After capturing the demon, the champion broke its will, and used it to watch a secret meeting between Gul'dan, [[Teron'gor]] and {{Au|Cho'gall}}. Teron'gor was dispatched to attack {{Au|Auchindoun}} in [[Talador]] while Cho'gall left to assault {{Au|Oshu'gun}}. Gul'dan discovered quickly the observer's duplicity and annihilated it to the champion's horror.<ref>[[Ominous Portents]]</ref> |
||
| + | |||
| + | While updates on Teron'gor's and Cho'gall's activities were interesting, Khadgar believed this might be a good opportunity to capture Gul'dan. He sent the champion back to Gul'var to kill some of the warlock's other lieutenants and a demon they had summoned to create a device to subdue him.<ref>[[Soul Shards of Summoning]]</ref><ref>[[Heart On Fire]]</ref><ref>[[Forging the Soul Trap]]</ref> |
||
| + | |||
| + | When the champion confronted Gul'dan at [[Shadow Rise]] nearby, Gul'dan struggled briefly but overcame the attempt to imprison him. He forced [[Razuun]] to attack his assailant. While the champion quickly defeated Razuun, Gul'dan escaped to Talador to assist Teron'gor with his plan. The champion returned to Starfall Outpost to report the failure to Khadgar. While mulling over the results, {{Au|Garona Halforcen}} appeared from the shadows to attack Khadgar, who used [[Ice Block]] just in time to protect himself. Cordana and Garona traded a few blows but Garona managed to stun Cordana and escape. Cordana warned the Archmage that Gul'dan is gunning for him and he should stay at the garrison where it's safe. Khadgar, unperturbed by the attempt on his life, told her not to worry and that he can take care of himself.<ref>[[To Catch a Shadow]]</ref> |
||
| + | {{Next story|[[Khadgar]] and [[Cordana Felsong]]|The Battle for Shattrath|[[Talador]]}} |
||
| + | |||
| ⚫ | |||
| ⚫ | |||
| ⚫ | Continuing the tradition started on the [[Timeless Isle]], Shadowmoon Valley has a huge number of [[vignette]]s, which are one-time events like killing rare mobs, looting treasure chests, or completing scripted events. Nearly all of the vignettes reward [[Garrison Resources]] in addition to an uncommon or rare-quality item. |
||
| + | {{Shadowmoon Valley (alternate universe) vignettes}} |
||
==Resources== |
==Resources== |
||
| + | * [[Cloth]] |
||
| − | [[File:Stub.png|20px]] ''Please add any available information to this section.'' |
||
| + | ** [[Sumptuous Fur]] |
||
| + | * [[Herbalism]] |
||
| + | ** [[Frostweed]] |
||
| + | ** [[Starflower]] |
||
| + | ** [[Draenic Seeds]] |
||
| + | * [[Skinning]] |
||
| + | ** [[Raw Beast Hide]] |
||
| + | * [[Mining]] |
||
| + | ** [[Blackrock Ore]] |
||
| + | ** [[True Iron Ore]] |
||
| + | ** [[Draenic Stone]] |
||
==Wild pets== |
==Wild pets== |
||
| + | *[[Forest Spiderling]] |
||
| − | {{Stub-section}} |
||
| − | *[[ |
+ | *[[Moonshell Crab]] |
| + | *[[Mossbite Skitterer]] |
||
| + | *[[Royal Moth]] |
||
| + | *[[Waterfly]] |
||
| + | *[[Zangar Crawler]] |
||
==Wild creatures== |
==Wild creatures== |
||
| Line 212: | Line 299: | ||
*{{RaceIcon|Crab}} [[Crab]]s |
*{{RaceIcon|Crab}} [[Crab]]s |
||
*{{RaceIcon|Eel}} [[Eel]]s |
*{{RaceIcon|Eel}} [[Eel]]s |
||
| − | *{{RaceIcon| |
+ | *{{RaceIcon|Elekk2}} [[Elekk]] |
*{{RaceIcon|FaerieDragon}}{{RaceIcon|FeyDragon}} [[Faerie dragon]]s |
*{{RaceIcon|FaerieDragon}}{{RaceIcon|FeyDragon}} [[Faerie dragon]]s |
||
| ⚫ | |||
*{{RaceIcon|Grouper}} [[Grouper]]s |
*{{RaceIcon|Grouper}} [[Grouper]]s |
||
*{{RaceIcon|Hydra2}} [[Hydra]]s |
*{{RaceIcon|Hydra2}} [[Hydra]]s |
||
| − | *{{RaceIcon| |
+ | *{{RaceIcon|Kaliri2}} [[Kaliri]] |
*{{RaceIcon|Makrura}} [[Makrura]] |
*{{RaceIcon|Makrura}} [[Makrura]] |
||
*{{RaceIcon|Mandragora}} [[Mandragora]]s |
*{{RaceIcon|Mandragora}} [[Mandragora]]s |
||
| Line 228: | Line 316: | ||
*{{RaceIcon|Sporebat}} [[Sporebat]]s |
*{{RaceIcon|Sporebat}} [[Sporebat]]s |
||
*{{RaceIcon|Squirrel}} [[Squirrel]]s |
*{{RaceIcon|Squirrel}} [[Squirrel]]s |
||
| − | *{{RaceIcon| |
+ | *{{RaceIcon|Talbuk2}} [[Talbuk]] |
*{{RaceIcon|Toad}} [[Toad]]s |
*{{RaceIcon|Toad}} [[Toad]]s |
||
*{{RaceIcon|WarpStalker}} [[Warp stalker]]s |
*{{RaceIcon|WarpStalker}} [[Warp stalker]]s |
||
| ⚫ | |||
*{{RaceIcon|SavageWolf}} [[Wolf|Wolves]] |
*{{RaceIcon|SavageWolf}} [[Wolf|Wolves]] |
||
**{{RaceIcon|VoidWolf}} [[Void wolf|Void wolves]] |
**{{RaceIcon|VoidWolf}} [[Void wolf|Void wolves]] |
||
| − | ==Notes== |
+ | ==Notes and trivia== |
| + | *Shadowmoon Valley is known for having deep [[crystal]] [[Gold mine|mines]].<ref>[[Artificer Maatun's Journal]]</ref> |
||
*While leveling, players should avoid [[Socrethar's Rise]] and [[Darktide Roost]] as these are level 100 areas. Avoiding them shouldn't be too difficult as they are out of the way during the leveling process. |
*While leveling, players should avoid [[Socrethar's Rise]] and [[Darktide Roost]] as these are level 100 areas. Avoiding them shouldn't be too difficult as they are out of the way during the leveling process. |
||
==Gallery== |
==Gallery== |
||
<gallery> |
<gallery> |
||
| + | Shadowmoon Valley.jpg |
||
| − | File:Shadowmoon_Valley.jpg |
||
| + | Shadowmoon Valley 2.jpg |
||
| − | File:Shadowmoon_Valley_(2).jpg |
||
| + | Shadowmoon Valley 3.jpg |
||
| − | File:Shadowmoon_Valley_(3).jpg |
||
| + | Draenor alpha map.jpg|The Draenor satellite map during alpha, with an Iron Horde assault in Shadowmoon. |
||
| + | Purge of Grommar.png|"Purge of Grommar", the cut Iron Horde assault scenario. |
||
| + | WorldMap-ShadowmoonValleyDR-beta.jpg|Beta zone map, displaying [[Gar'mak Quarry]] and [[Grommar]]. |
||
| + | WorldMap-ShadowmoonValleyDR-beta2.jpg|Beta zone map 2. |
||
</gallery> |
</gallery> |
||
| + | |||
| + | ==Videos== |
||
| + | <vplayer/> |
||
| + | *{{#vlink:QXwKtsRKCJA|The Story of Shadowmoon Valley }} |
||
==Patch changes== |
==Patch changes== |
||
| − | *{{Patch |
+ | *{{Patch 7.3.5|note=Level scaling implemented, previous zone level: 90 - 93.}} |
| + | *{{Patch 6.0.2|note=Added.}} |
||
==References== |
==References== |
||
| − | {{Reflist| |
+ | {{Reflist|3}} |
==External links== |
==External links== |
||
| + | <!-- Please read https://wowpedia.fandom.com/Wowpedia:External_links_policy before adding new links. --> |
||
| − | {{ |
+ | {{Elinks-zone|6719}} |
| − | {{Shadowmoon Valley}} |
+ | {{Shadowmoon Valley (alternate universe)}} |
{{Draenor}} |
{{Draenor}} |
||
| ⚫ | |||
| − | [[ |
+ | [[Category:Shadowmoon Valley (alternate universe)| ]] |
| + | [[Category:Alternate universe locations| ]] |
||
| + | |||
| + | [[es:Valle Sombraluna (alternate universe)]] |
||
| + | [[pl:Shadowmoon Valley (alternate universe)]] |
||
Latest revision as of 22:18, 26 May 2023
- For the Outland zone, see Shadowmoon Valley.
| Level: 10 - 50 Battle Pet Level: 23 - 25 | |
|---|---|
 Concept art of Draenor's Shadowmoon Valley. | |
| Capital(s) |
|
| Races |
|
| Government |
Theocracy Tribal chiefdom |
| Ruler(s) |
|
| Former ruler(s) |
|
| Major settlements |
|
| Minor settlements |
|
| Languages | Draenei, Orcish, Common |
| Faiths |
Holy Light Shamanism |
| Affiliation | Alliance, Shadowmoon clan, Iron Horde |
| Location | Southeastern Draenor |
| PvP status | Contested territory |
“Hidden under a shroud of perpetual night broken only by bright starlight, the lush, idyllic forests of Shadowmoon Valley are home to a majestic draenei tomb and sanctuary: Karabor. While many of Shadowmoon’s denizens study prophecy among Karabor’s ancient stone circles, plotters with darker ambitions lurk in the valley’s vast underground cave network, gazing greedily at the sacred temple.”
“In moments of great strife, I gaze into the heavens and see just how far we have already come.”
Shadowmoon Valley is a zone in south-eastern Draenor. A lush valley engulfed in eternal night, the Pale Lady shines so brightly here that it even replaced the sun as the valley's primary light source during the day. Shadowmoon serves as one of the key centers of draenei civilization on the world of Draenor, its heart being the sacred temple of Karabor. Lately, the Iron Horde began advancing on the draenei settlements through the Shadowmoon clan and naval attacks targeting Karabor itself.
The Alliance expedition arrives in the zone after the completion of the introductory mission in Tanaan Jungle, which involves the destruction of the Dark Portal.
Introduction
Shadowmoon Valley is a very distinctive land, located in southeastern Draenor. The valley's bright daytime isn't caused by Draenor's sun, unlike other lands of the planet, but its larger moon illuminating its vast, lush landscape and starry skies - hence its name. It features blue-ish flora, vast plains and rocky mountains, as well as numerous draenei settlements - including the sacred temple of Karabor. The valley is populated with majestic beasts of the primordial world, such as elekks, nether rays and others.
It also features a mushroom forest named Umbrafen at the northern coastline, much like the other regions of Draenor. The southern coastline leads to the Evanescent Sea.
The orcish Shadowmoon clan, led by Ner'zhul also populates the region and seemingly have practiced their magic for some time, and are possibly the ones who erected the stone obelisks dotting some parts of the valley. After the Iron Horde began their march against the draenei civilization, the Shadowmoon Clan also participated as part of the greater orcish union that intended to consolidate their race's power over their homeworld, and later - the worlds beyond. The Shadowmoon clan is also notable for dabbling into the void magics.
Not all orcs share the Shadowmoon clan's fascination with void magics, though. The Shadowmoon Exiles have split from the Shadowmoon clan, seeking a peaceful life for themselves and trying to co-operate with the draenei and recently arrived Alliance forces, even if it means killing their former tribesmen in order to prevent greater bloodshed.
Geography
Maps and subregions
Map of Shadowmoon Valley, Horde point of view (Alliance's PoV until unlocking the Garrison).
Map of Shadowmoon Valley, Alliance unlocked Garrison.

Map of Shadowmoon Valley, Alliance unlocked Shipyard.

Instances
| Instance name | Level range | Group size | Approximate run time |
|---|---|---|---|
| 100 | 5 player | Unknown |
Adjacent regions
| Zone Name | Faction | Level Range | Direction | Access |
|---|---|---|---|---|
| Talador | 94-96 | Northwest | By foot or by flight path | |
| Spires of Arak | 96-98 | West | By foot or by flight path | |
| Tanaan Jungle | 100 | North | By swimming through the Tanaan Channel |
Notable characters
- Main article: Shadowmoon Valley (alternate universe) NPCs
 Exarch Akama
- Exarch Maladaar
- Exarch Naielle
- Exarch Othaar
- Velen
- Vindicator Maraad
- Yrel
- Ner'zhul
- Cordana Felsong
- Khadgar
- Rexxar
Quests
Shadowmoon clan's settlement.
- Main article: Shadowmoon Valley (alternate universe) storyline
Chapter 1: Establishing a Foothold
| This chapter continues the story of Yrel and Maraad from the Assault on the Dark Portal scenario. |
After landing on the shores of Shadowmoon Valley, the champion, Khadgar, Exarch Maladaar, Vindicator Maraad, Yrel and the Draenei rescued from the Bleeding Hollow were greeted by Velen, who was eager for allies against the Iron Horde.[2] Velen led the champion to the Shadowmoon ruins of Lunarfall, a commanding position at which the Alliance might build a base. Khadgar opened a portal to Stormwind for reinforcements and supplies and through it came a small army of footmen and peasants ready to break ground.[3] Construction was briefly interrupted by attacks by local fauna, but the champion subdued the local wildlife[4][5] and the garrison was completed.[6]
Chapter 2: Shadows Awaken
With the garrison constructed, Yrel asked the champion to accompany her back to her home of Embaari Village. When they arrived, Yrel introduced the champion to her sister Samaara, who was overjoyed and a little surprised to see her younger sister was still alive.[7] However, they learned that the nearby village of Arbor Glen was under siege by the Shadowmoon. The champion left to stop the invasion[8] and rescue survivors,[9] joining with Velen and Yrel to confront Ner'zhul at the Teluuna Observatory. Ner'zhul kidnapped Samaara and summoned the void lord Karnoth to distract the champion while he made his escape.[10]
Chapter 3: A Sister's Sacrifice
The champion, Velen and Yrel traveled to Twilight Glade, a village near the Shadowmoon capital of Shaz'gul. In spite of Yrel's doubts, Velen placed Yrel in charge of the Rangari of the area with orders to sabotage the Shadowmoon camp and rescue the captives.[11] While Yrel and the Rangari performed reconnaissance on Shaz'gul, Velen prepared a prophetic elixir to peer into the future of Karabor with the champion's assistance.[12] In their shared vision, Velen and the champion saw the Dark Star, a naaru allied with the Iron Horde rain destruction upon Karabor as an endless stream of Iron Horde soldiers invaded the city and slaughtered its defenders. Velen and the champion both resolved to prevent this catastrophe, and the champion left to assist Yrel with the infiltration of Shaz'gul while Velen contemplated their next move.[13]
Yrel and the champion disguised themselves as Shadowmoon orcs and infiltrated Shaz'gul. The champion placed explosives in key locations around the city and attempted to rescue the captive draenei, but the captives had already been moved to Anguish Fortress before they arrived.[14] The failure to rescue the captives hit Yrel particularly hard, and it was only the depth of the champion's experiences on Azeroth that gave her the courage to detonate the bombs. Their cover blown, the champion and Yrel then fled the ruined city for Twilight Glade.[15]
When Yrel and the champion returned, Velen informed them that they were going to seek the help of Rulkan and the other exiles of the Shadowmoon. The champion traveled to Exile's Rise on Velen's behalf.[16] When the champion arrived, Rulkan explained that Ner'zhul seeks the power of the Dark Star because Grommash Hellscream had threatened to wipe the Shadowmoon out if they didn't join the Iron Horde. The Shadowmoon were a simple and spiritual tribe of nomads that did not have anything to contribute to the Horde in martial might or weaponry, so Ner'zhul opted to offer the only thing they had: magic. He led the Shadowmoon away from their ancestor worship and into necromancy and dark magic, violating all of the Shadowmoon's ancient taboos to prove his loyalty to the Iron Horde and stay the wrath of the Warchief. Rulkan than gave the champion her keystone to open the entrance to Anguish Fortress.[17]
The champion led the attack on Anguish Fortress, using the keystone to disable its magical barrier from the inside,[18] defeating the void creatures the Shadowmoon had summoned with the souls of their ancestors and the captured Draenei[19] and rescuing the draenei captives that had not been sacrificed yet.[20] However, Samaara was not among the rescued captives. With the defenses disabled, Yrel and Velen joined the champion to confront Ner'zhul at the Terrace of the Stars. Before they could act, Ner'zhul sacrificed Samaara to summon the void lord Arkeddon to demonstrate to Grom Hellscream what the Dark Star was capable of. Ner'zhul and Grom left to begin their preparations for the invasion of Karabor while the champion, Yrel and Velen destroyed Arkeddon. After Arkeddon was defeated, Samaara lay dying at the ritual altar. As Samaara died in her arms, Yrel resolved to work with the champion destroy the Iron Horde.[21]
Chapter 4: The Light Prevails
With Ner'zhul beginning the ritual to control the Dark Star at Light's Fall, Velen sent the champion ahead to delay the ritual long enough for him to prepare to stop it. The champion confronted and fought Ner'zhul at Light's Fall. As Ner'zhul began to weaken, Velen arrived and told Ner'zhul that he could still turn from the path of destruction and that the draenei would protect him. Ner'zhul refused, saying that he could no longer redeem himself. Ner'zhul then summoned a Void Horror in a last ditch effort to forestall the champion. The void beast bought Ner'zhul the time he needed to complete the ritual and Ner'zhul summoned the Dark Star in triumph. With the knowledge of what the Dark Star would do to Karabor if left unchecked, Velen knew must be done. He gravely looked at Yrel and passed her the prophetic sigil he bore, anointing her the leader of the draenei and sacrificed himself to restore the Light in the naaru and defeat the Dark Star.[22]
While Ner'zhul's plan was thwarted, Maraad arrived with grave news—Karabor's defense crystal had fallen. Maraad urged Yrel and the champion to gather up the draenei survivors and flee. Yrel refused, resolving that Velen's sacrifice would be in vain if Karabor fell anyway. She and the champion gathered up the survivors and departed to Karabor to break the siege. On wings of fey dragons, Yrel, Maraad and the champion broke the siege at Karabor's gates and fought through the city until they reached the docks.[23]
Thanks to Velen's sacrifice at Light's Fall, the naaru that was the Dark Star, K'ara was on the other side of the battle from the vision at Twilight Glade. The champion and Yrel protected K'ara while he prepared a devastating counterattack. Commander Vorka himself attacked K'ara to stop her, but the champion and Yrel overcame his assault. With the Iron Horde's forces breaking, K'ara unleased the Light upon the Iron Fleet in the harbor, sinking their ships and vanquishing the remaining assault.[24]
After resting from their victory, Yrel mailed the champion ![]() [The Prophet's Arcanum], which the champion used at Karabor to receive a message from Velen. Velen's memories told the champion that Dark Star was in fact K'ara, ejected from the Genedar when it crashed upon Draenor. Velen had kept this a secret, worried what the knowledge might do in the wrong hands. Ner'zhul and the Shadowmoon had independently discovered this, and Velen needed to give his life—his Light—to redeem K'ara and stop Ner'zhul.
[The Prophet's Arcanum], which the champion used at Karabor to receive a message from Velen. Velen's memories told the champion that Dark Star was in fact K'ara, ejected from the Genedar when it crashed upon Draenor. Velen had kept this a secret, worried what the knowledge might do in the wrong hands. Ner'zhul and the Shadowmoon had independently discovered this, and Velen needed to give his life—his Light—to redeem K'ara and stop Ner'zhul.
| The story of Yrel and Maraad continues with We Need an Outpost in Gorgrond. |
Dungeon: Shadowmoon Burial Grounds
- Main article: Shadowmoon Burial Grounds
Though they were defeated in the Defense of Karabor, Ner'zhul and his closest allies retreated deeper into the Anguish Fortress to revive the souls of the dead and attack Karabor again. The champions of the Alliance and Horde invaded and defeated Ner'zhul and his lieutenants, ending the Shadowmoon threat once and for all.
Sidestory: The Pursuit of Justice
| This chapter continues the story of Exarch Maladaar from the Assault on the Dark Portal scenario. |
With their garrison built, the Alliance champion and Vindicator Maraad quickly realized that garrison's ever-growing army was going to quickly run out of food. Maraad contacted Exarch Akama in Elodor about sharing in their harvest. Akama agreed, provided that the champion supply additional labor to help with the harvest. A caravan led by Foreman Zipfizzle set off to Elodor with labor and plans to return with food.[25]
The champion and most of the caravan arrived in Elodor unscathed, but the wagon Maraad was riding in fell behind. When it didn't turn up with the rest, the champion and Akama went back across the plain to find it. When they found it, they learned the Shadowmoon had ambushed them. The farmers were panicked, but Akama encouraged them to stand their ground, as even a sickle is a powerful weapon when wielded with the force of the Light behind it. The Shadowmoon repeatedly attacked as the champion, Akama, Maraad and the farmers made the rest of the way to Elodor, but there were no casualties of the champion's company.[26]
After arriving in Elodor, Akama and Maraad left to meet the Council of Exarchs while the champion was introduced to Exarch Hataaru and helped him repair Elodor's defense crystal.[27] A brief attack by the Shadowmoon followed, which the champion and the Elodor defenders quickly repelled. While the defense crystal was proven fully operational, the alien technology agitated the local fungi and an Enraged Fungal Giant attacked it shortly after the Shadowmoon retreated.[28] After the champion and Elodor defenders subdued it, the champion was brought to the Council by Maraad. The Exarchs greeted the champion genially but cautiously.[29] The champion resolved to win the trust of the Exarchs by assisting them with their own pressing concerns—Exarch Hataaru with a malfunctioning crystal in the Elodor Dig[30] and Exarch Naielle with a poisonous spore population in the Umbrafen.[31]
When the champion returned to the council, however, they found Maladaar had gone missing.[32] When the champion found Malaadar, he said that he was worried that the Burning Legion had infiltrated the city. With Maladaar's help, the champion tracked down a Legion hideout in a cave under the city and killed a demon that was hiding there.[33] When the champion went to the Council to report what they had discovered they found Exarch Hataaru dead.[34] Maladaar took investigating Hataaru's assassination into his own hands and with the help of Soulbinder Nyami was able to commune with Hataaru's spirit. Maladaar asked why Hataaru was killed and Hataaru said it was under an Exarch's orders. When Maladaar asked Hataaru who had him killed, Hataaru's spirit pointed at Nyami and Nyami abruptly ended the ritual, saying that his spirit was in great agony.[35]
Maladaar provided the champion with a device to install upon Exarch's Rise to reveal the traitor. When the champion used the device, it revealed that Exarch Othaar was the traitor. Othaar had taken a new name as a man'ari--Socrethar and fought the champion until he became weak and retreated.[36] For the champion's efforts on their behalf, the Council resolved to support the Alliance fully[37] and permitted the champion to hire a follower from Elodor for their garrison to serve as their ambassador.[38]
| The story of Exarch Maladaar and Soulbinder Nyami continues with In the Shadows of Auchindoun in Talador. |
Sidestory: Gloomshade Grove
Ken Loggin informed the champion that Shelly Hamby and her crew of lumberjacks traveled to Gloomshade Grove to harvest lumber but haven't returned in several days. The champion decided to investigate. Outside the grove, the champion found a pack mule used by the crew that was suspiciously unattended.[39] After entering the grove, the champion met a podling named Phlox who helped the champion follow a trail of clues to a grotto along the beach. Here, Phlox revealed that he had captured the lumberjacks and attempted to kill the champion. Phlox was easily overcome, and the champion found Jarrod Hamby dying in the cave behind where Phlox attacked them.[40]
Jarrod explained to the champion that the podlings ate Ryan Metcalf and that he was mortally wounded himself. Jarrod died, asking the champion to kill the podling king, Deathbloom. The champion killed many of podlings in vengeance for their murdered peasants and assassinated Deathbloom at his lair.[41] The champion found Shelly Hamby bound in vines nearby. After releasing her, Shelly broke down about her husband's murder and swore to serve the champion as a follower as long as she gets to kill as many podlings as possible.[42]
Sidestory: Purifying the Gene Pool
The champion was asked by Farmer Gehaar at the Teluuna Observatory to visit the Draakorium to investigate the recent aggressive activities of the Botani in the Southern region of the valley. Upon arriving there, the champion met with Prelate Reenu who sent them into the bog to investigate a caravan that had been recently attacked. The champion found Fiona's caravan at the entrance to the bog and Gidwin Goldbraids poisoned by local flora.[43] The champion collected local herbs and chemicals and helped Fiona prepare a remedy for the poison.[44][45][46]
With Gidwin cured, the champion and Rangari Arepheon ventured deeper into the bog to determine why the Botani had become more aggressive lately.[47] They found an immature genesaur growing deep in the grove—the Botani were collecting corpses to help it grow. The champion and Arepheon then slew the genesaur before it could mature to stop the attacks.[48] Fiona, again impressed with the champion's capabilities and thankful for the assistance in saving Gidwin, joined the champion as a follower.[49]
Sidestory: On the Shadow's Trail
| This chapter continues the story of Khadgar and Cordana Felsong from the Assault on the Dark Portal scenario. |
After the events in Gorgrond, Cordana Felsong delivered the champion a request to meet Khadgar at his own camp at the Starfall Outpost.[50] Khadgar has tracked Gul'dan's Shadow Council to the nearby village of Gul'var and tasks the champion and Cordana with capturing an observer from the village that they can use to spy on the warlocks.[51] After capturing the demon, the champion broke its will, and used it to watch a secret meeting between Gul'dan, Teron'gor and Cho'gall. Teron'gor was dispatched to attack Auchindoun in Talador while Cho'gall left to assault Oshu'gun. Gul'dan discovered quickly the observer's duplicity and annihilated it to the champion's horror.[52]
While updates on Teron'gor's and Cho'gall's activities were interesting, Khadgar believed this might be a good opportunity to capture Gul'dan. He sent the champion back to Gul'var to kill some of the warlock's other lieutenants and a demon they had summoned to create a device to subdue him.[53][54][55]
When the champion confronted Gul'dan at Shadow Rise nearby, Gul'dan struggled briefly but overcame the attempt to imprison him. He forced Razuun to attack his assailant. While the champion quickly defeated Razuun, Gul'dan escaped to Talador to assist Teron'gor with his plan. The champion returned to Starfall Outpost to report the failure to Khadgar. While mulling over the results, Garona Halforcen appeared from the shadows to attack Khadgar, who used ![]() [Ice Block] just in time to protect himself. Cordana and Garona traded a few blows but Garona managed to stun Cordana and escape. Cordana warned the Archmage that Gul'dan is gunning for him and he should stay at the garrison where it's safe. Khadgar, unperturbed by the attempt on his life, told her not to worry and that he can take care of himself.[56]
[Ice Block] just in time to protect himself. Cordana and Garona traded a few blows but Garona managed to stun Cordana and escape. Cordana warned the Archmage that Gul'dan is gunning for him and he should stay at the garrison where it's safe. Khadgar, unperturbed by the attempt on his life, told her not to worry and that he can take care of himself.[56]
| The story of Khadgar and Cordana Felsong continues with The Battle for Shattrath in Talador. |
Vignettes
Continuing the tradition started on the Timeless Isle, Shadowmoon Valley has a huge number of vignettes, which are one-time events like killing rare mobs, looting treasure chests, or completing scripted events. Nearly all of the vignettes reward ![]() [Garrison Resources] in addition to an uncommon or rare-quality item.
[Garrison Resources] in addition to an uncommon or rare-quality item.
")
Resources
Wild pets
Wild creatures

A herd of elekks wandering the valley. Karabor can be seen in the background.
- Ancients
- Arcane elementals
- Boars
- Crabs
- Eels
- Elekk
- Faerie dragons
- Fireflies
- Groupers
- Hydras
- Kaliri
- Makrura
- Mandragoras
- Moths
- Nether rays
- Orchids
- Ravagers
- Riverbeasts
- Rylaks
- Skeletons
- Sporebats
- Squirrels
- Talbuk
- Toads
- Warp stalkers
- Wolves
Notes and trivia
- Shadowmoon Valley is known for having deep crystal mines.[57]
- While leveling, players should avoid Socrethar's Rise and Darktide Roost as these are level 100 areas. Avoiding them shouldn't be too difficult as they are out of the way during the leveling process.
Gallery

The Draenor satellite map during alpha, with an Iron Horde assault in Shadowmoon.
"Purge of Grommar", the cut Iron Horde assault scenario.
Beta zone map, displaying Gar'mak Quarry and Grommar.
Beta zone map 2.


Videos
Patch changes
- Patch 7.3.5 (2018-01-16): Level scaling implemented, previous zone level: 90 - 93.
- Patch 6.0.2 (2014-10-14): Added.
References
- ^ The Art of World of Warcraft: Warlords of Draenor, pg. 43
- ^ [10-40] Finding a Foothold
- ^ [10-40] For the Alliance!
- ^ [10-40] Ravenous Ravens
- ^ [10-40] Quakefist
- ^ [10-40] Establish Your Garrison
- ^ [10-40] A Hero's Welcome
- ^ [10-40] Closing the Door
- ^ [10-40] Think of the Children!
- ^ [10-40] Shadows Awaken
- ^ [10-40] Into Twilight
- ^ [10-40] The Clarity Elixir
- ^ [10-40] The Fate of Karabor
- ^ [10-40] Going Undercover
- ^ [10-40] Escape From Shaz'gul
- ^ [10-40] Chasing Shadows
- ^ [10-40] Ancestor's Memory
- ^ [10-40] Into Anguish
- ^ [10-40] Harbingers of the Void
- ^ [10-40] The Great Salvation
- ^ [10-40] The Dark Side of the Moon
- ^ [10-40] Darkness Falls
- ^ [10-40] The Righteous March
- ^ [10-40] The Defense of Karabor
- ^ [10-40] Migrant Workers
- ^ [10-40] Circle the Wagon
- ^ [10-40] Invisible Ramparts
- ^ [10-40] Defenstrations
- ^ [10-40] The Exarch Council
- ^ [10-40] Shut 'er Down
- ^ [10-40] Fun with Fungus
- ^ [10-40] Exarch Maladaar
- ^ [10-40] Trust No One
- ^ [10-40] Warning the Exarchs
- ^ [10-40] Speaker for the Dead
- ^ [10-40] The Traitor's True Name
- ^ [10-40] Supply Drop
- ^ [10-40] Friend of the Exarchs
- ^ [10-40] Lost Lumberjacks
- ^ [10-40] Gloomshade Grove
- ^ [10-40] Game of Thorns
- ^ [10-40] Shelly Hamby
- ^ [10-40] Crippled Caravan
- ^ [10-40] Fiona's Solution
- ^ [10-40] Swamplighter Queen
- ^ [10-40] Cooking With Unstable Herbs
- ^ [10-40] Blademoon Bloom
- ^ [10-40] Gestating Genesaur
- ^ [10-40] Fiona
- ^ [10-40] Meet Us at Starfall Outpost
- ^ [10-40] Catching His Eye
- ^ [10-40] Ominous Portents
- ^ [10-40] Soul Shards of Summoning
- ^ [10-40] Heart On Fire
- ^ [10-40] Forging the Soul Trap
- ^ [10-40] To Catch a Shadow
- ^ [Artificer Maatun's Journal]
External links
| ||||||||||||||
