The subject of this article was removed in patch 8.0.1 but remains in World of Warcraft: Wrath of the Lich King Classic.
|
| | |
|---|---|
| Level: 65 - 110 | |
 | |
| Races |
|
| Affiliation | Horde, Alliance, Titans |
| Location | Frozen Sea (south of Dragonblight in Northrend) |
| PvP status | Combat zone |
| Conflict in the Strand of the Ancients | |||||||||||
|---|---|---|---|---|---|---|---|---|---|---|---|
| Location | Strand of the Ancients | ||||||||||
| Result | Unknown, ongoing | ||||||||||
| |||||||||||
| Previous | Conflict in the Eye of the Storm | ||||||||||
| Next | Battle for Wintergrasp | ||||||||||
Strand of the Ancients (SotA for short), was a 15 vs 15 battleground located off the southern coast of the Dragonblight. Here upon the glittering sands of Northrend the Horde and Alliance battled to be the first to capture the mysterious titan relic housed behind the crumbling walls of this ancient citadel.
Strand of the Ancients was a two-turn battleground featuring siege engines, gun turrets and seaforium charges. The battleground layout consisted of several gates spread across three walls which had to be destroyed in order to continue, capture points and a graveyard after each wall. Teams took turns to attack, using siege engines and bombs to destroy the citadel's walls, while the opposing team defended it using machine gun turrets and man-power. The attackers' goal was to break through walls and capture the relic inside, while the defending team attempted to resist the assault for the duration of the round. The winner was the team which captured the relic in the shortest time.
Players could queue for Strand of the Ancients from level 65, through the PvP interface. The battleground was removed from the game in patch 8.0.1.[1][2]
Official overview
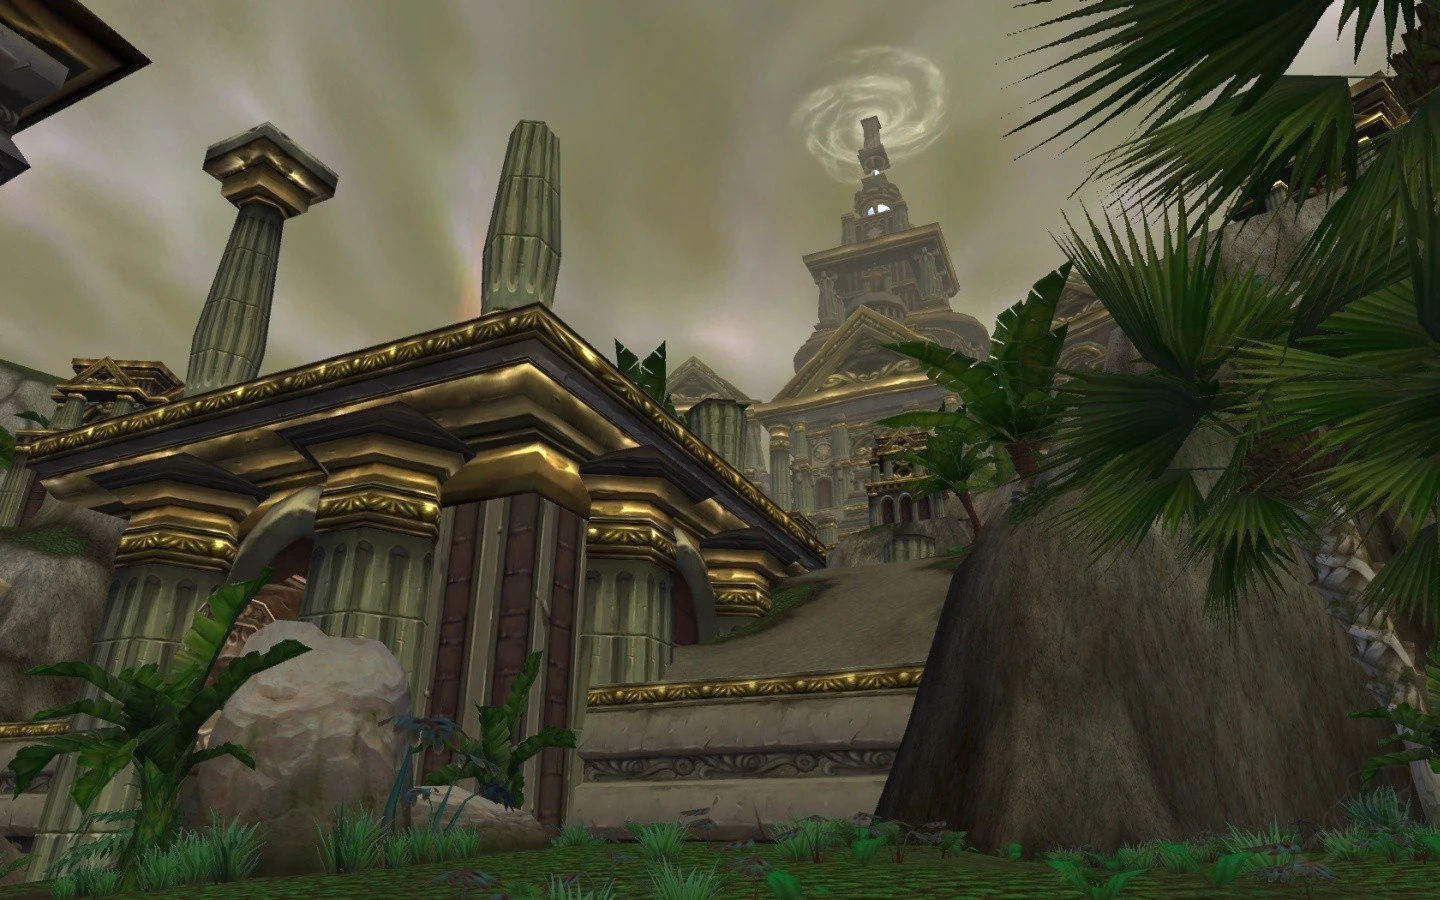
The world-shaping titans have left their mark on frozen Northrend, though often their presence is embedded in the ground, as in mysterious Ulduar. Yet, on a narrow island chain, a sliver of titan handiwork is out in the 'open'.
As Horde and Alliance vanguards began to course over the continent of Northrend, their mystics awoke to dizzying visions of an isle, and a gleaming power behind heights of stone. The Strand’s long-abandoned citadel towers and great gates loom mightily...but there’s crumbling rock and rust among those fortifications. They can be brought down.
Disembark on the Strand with your war machines and fellow soldiers, smash the walls of yesteryear and claim a prize of eons’ past. Or seize the titans’ once-magnificent bulwark, man their guns, and blast your enemies back into the sea.[3]
Description
To the south of Dragonblight lies the resting place of a legendary Titan artifact known by the Alliance and Horde to possess critical information regarding the Titans and their methods. Strand of the Ancients is a 15 vs 15 battleground, where each side takes a turn attacking and defending the Titan artifact at the southern tip of the island. Prepare yourself for battle, for fate cannot determine success upon this Strand of the Ancients.
Geography
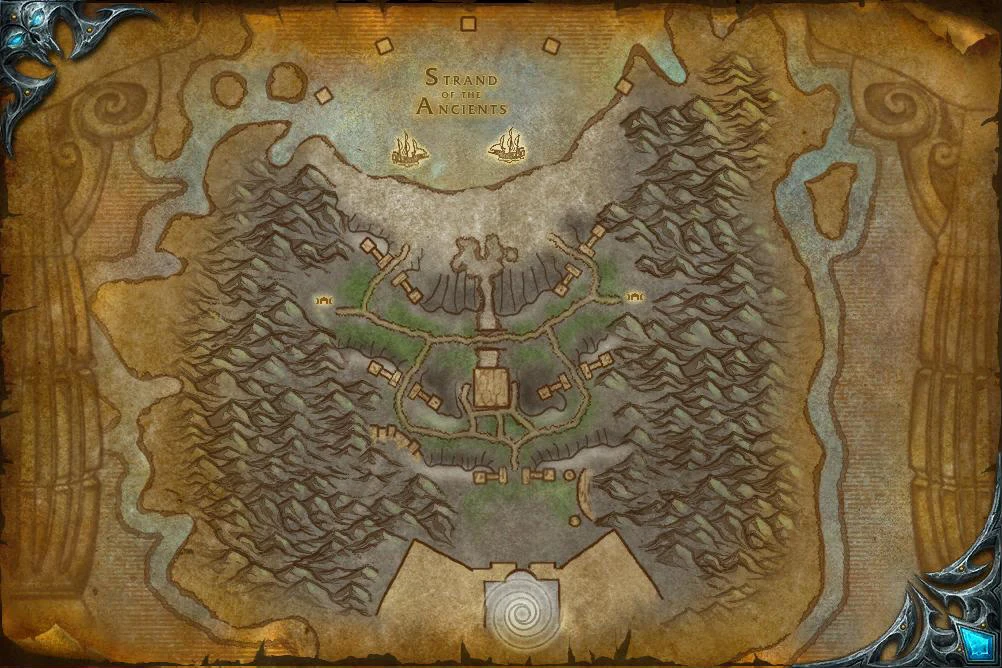
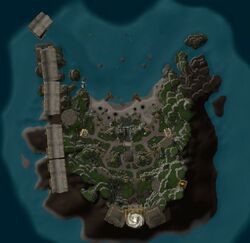
Maps and subregions
|
|
Overview
Goal
Strand of the Ancients is played in two rounds, each lasting up to 10 minutes. Each team has a maximum of 15 players; a team will be assigned to be either the attacking team or the defending team. Attackers prepare for battle split into two boats that approach the northern end of the strand, while defenders spawn at the southern graveyard and should move toward defensive positions.
The attacking team lands on the island at the start of the battleground and will use siege weapons to break through the island's walls and capture graveyards along the way. After the first team captures the relic, or 10 minutes have elapsed, the factions will switch, so the attacking team will become the defending team and vice versa[4]. It is described as a "D-day invasion scenario".[5]
In patch 3.2.0 a "coin toss" was implemented for Strand of the Ancients, which randomizes which faction starts on offense and which starts on defense.[6] Prior to this coin toss, the Alliance team always started on offense.
Basic rules
- The attacking team starts off-shore on two boats, splitting the attacking team, and moves south toward the relic.
- The defending team starts at South Graveyard and moves to defensive positions on the beach or on the turrets next to the walls.
- There are a total of 6 walls. There are 2 sets of 2 on each side, and then 2 in the middle line to block the way to the end.
- There are Siege weapons which will help you destroy the walls, buildings and enemy players.
- Graveyards are captured by clicking on them and completing a channeled effect, much like Arathi Basin.
- As you capture graveyards on both sides, more siege engines will spawn at the depots behind the first gates. This will allow faster attacks on the remaining 2 gates.
- Graveyards cannot be re-captured by the defending team once they have been capped.
- Defenders can make use of the turrets on the walls to destroy siege vehicles and kill enemy players.
- The faction who reaches the relic in the quicker amount of time wins. The second round attackers have as much time to capture the relic as the opposing team took to attain it, making it (at max) a 20 minute game.
- If neither team captures the relic, the game is considered a tie.
Honor reward system
Strand of the Ancients items are available by spending honor accumulated.
Reputation
The Valiance Expedition is the Alliance faction for the battleground, and the Warsong Offensive is the Horde faction. However, no reputation is earned by competing in this battleground.
Siege weapons
- Main article: Siege weapon
Battleground demolisher
 Hurl Boulder: Unlimited yd range — Hurls a massive boulder into the distance. This boulder deals Fire damage and 1000 seige damage to all enemies within 10 yards. (2 sec cooldown)
- Since the demolisher is slow to turn and the boulder throw takes time to hit, it is less effective against enemy players.
- Although it is very powerful, it is slow and not easily maneuverable. It is about as fast as running speed, has a fixed turning speed, and is susceptible to player snare abilities.
- The Demolisher has variable HP, depending on the driver's item level.
- Demolishers are also known as Tanks, or Demos.
Other weapons
Antipersonnel cannon
- Rocket Blast: 10-70 yd range — Fires a massive rocket into the distance. (2 sec cooldown)
- Shoots an explosive in the targeted area for 6,000 or so damage on demolishers and about 4,000 on players in the 80 bracket. (2 second CD)
- The Turret has 60,000 HP at level 80.
Seaforium charges
- Players on the attacking team can pick these up at the docks, at the vehicle emporiums, at the southern graveyard, and in a pile near the relic chamber, to the northwest of it. Players carrying a bomb will have a button that allows them to place it with a spell effect over their heads.
- Placing a bomb takes 2 seconds, and can be interrupted like a Battleground capture point.
- When laid, they explode after ten seconds, doing 4500 damage.
- Defending players can defuse these, and it is imperative they do. Disarming a bomb takes 2 seconds, and can be interrupted like a Battleground capture point.
- When a player dies while holding one, a barrel will spawn, allowing it to be carried on.
- You are allowed to mount while holding a charge.
Tactics
Some common tactics include rushing walls with charges, leaving so many charges at the wall makes it hard to defuse them before they all go off, Vehicle assault with melee defending the demolishers, or a combination of the two.
Defenders should make use of the turrets and pick off rushers as they run in. Paladins on a mount with crusader aura make this very difficult, but noticing the rush can save the wall. Also, try to take out demolishers unless a rusher gets your attention; most of the time, you will be in a lot more trouble against demolishers than a single mage targeting your turret.
Graveyards
As stated above, graveyards are captured via clicking on them and completing a channeled effect similar to the various capturable points in Arathi Basin and Alterac Valley.
On offense, you want to capture the Eastern and Western Graveyards as soon as possible in order to gain the additional demolishers. Some people argue that the Southern Graveyard shouldn't be captured until the relic door has been destroyed because doing so makes your team respawn away from tanks and bombs which slows down your team's ability to get new tanks back into the fight. However, capturing the Southern Graveyard makes your enemies spawn further away from the Yellow Gate which allows your tanks and bomb carriers to approach the gate unharmed.
On Defense, defend your east and west GY's with a furor. The turrets on the Red and Purple walls can shoot players that are trying to capture them making it very easy for 1 person to defend a GY. Let the Offense cap the south GY if the walls are still up, it will slow them down.
Turrets
Use turrets to destroy tanks and defend East and West GYs. A tag team of turret operators at a gate can kill a tank before it reaches the wall. The closer the target is to where the rocket lands the more damage it will take. Up to 6000 dmg against a tank and 3000 against a player. Note that the turret projectile has a significant travel time. When taking out a moving target, you must anticipate where it will be in the 1–2 seconds it takes for the rocket to explode. When firing on moving demolishers, target the ground about one tank-length in front of it. Demolishers move and turn slowly compared to players, so it is much easier to use the turrets on them. Additionally, enemy players tend to crowd around the demolishers, and will take damage as well.
The turrets cannot hit targets beneath them, so a tank that is left or right justified on the wall can only be hit by 1 of the turrets.
Demolishers
Some people argue that demolishers/tanks are the best means of winning this fight. Always capture the Eastern and Western Graveyards to increase tank supply and reduce travel time. Tanks should operate in groups, never go in one at a time. You will get 1) Owned 2) Yelled At 3) Laughed at by both teams. Tanks spawn two at a time at each workshop, so jump in one and ideally wait for another player to jump in the other before rolling out.
A note on tanks: ALWAYS DRIVE THEM TO THE GATE. NEVER USE A TANK TO ATTACK PLAYERS. It's pointless to attack players with a tank, just keep the tank moving to the gate.
While tanks are very effective at breaking through gates, they are slow and vulnerable. Other players need to provide support for the tanks, by killing or CCing enemy players who are attacking them. Snares and roots are effective at keeping melee away. Ranged classes should take passenger seats on the demolishers and take care of anyone that is attacking the demolisher.
Bombs
Seasoned players have discovered that Bombs are the most effective way to destroy walls for several reasons:
- Multiple Bombs can be placed at a single time on a single target
- Bombs must be disarmed
- Bombs can't be destroyed by Turrets
- Bombs can be carried while mounted
- Bombs can be carried while stealthed or invisible
- Bombs can be easily defended
Seaforium bombs can be found near almost any graveyard. They can be picked up while mounted, and carried while mounted, stealthed or invisible. After resurrecting, always grab a bomb, even if you aren't planning on using it immediately. It will come in handy if you make it to a wall.
Defenders should be on the lookout for enemies that try to sneak by towards a wall - they are probably carrying seaforium.
Strategies
Offensive
The primary goal of the offense is to get through all the gates to the ancient relic in the keep at the southern end of the battleground. The gates can only be brought down through seaforium charges and demolishers. When you are coming off the beach, take a seaforium charge if you intend on using it on the gate. This comes in handy when you're going against a defensive group that doesn't like to be out further than the gate and therefore wouldn't be able to disarm the charge in time. The defense will probably be waiting by the demolisher on the beach ready to attack it and destroy it before you have a chance to use it. Here and all throughout the game you have to make sure that opposing players on foot can't damage your demolishers, otherwise they'll never make it to the gates they have to knock down. Any players that can do slowing effects and damage from the passenger spots should join the demolishers:
- Mages can [Frost Nova], [Cone of Cold], and [Slow].
- Druids can use [Cyclone], [Entangling Roots] and [Typhoon].
- Rogues can use [Fan of Knives] with [Crippling Poison] applied or specced into [Deadly Brew].
- Warriors can [Intimidating Shout] or [Piercing Howl].
- Warlocks can [Curse of Exhaustion], [Howl of Terror], single target [Fear], and [Shadowflame] when augmented by [Glyph of Shadowflame].
- Death Knights can use [Desecration], [Hungering Cold], and [Chains of Ice].
- Priests can use [Psychic Scream], [Mind Flay] and [Psychic Horror].
- Hunters can use [Concussive Shot].
- Paladins can use [Hammer of Justice], and if spec'd with Glyph of Dazing Shield can use [Avenger's Shield]
- Shamans can use [Frost Shock], [Earthbind Totem] or even [Thunderstorm].
The defending team will have two turrets to every gate, and it's important that if they are manned ranged players work to destroy them without placing themselves in danger of getting shot by turrets. It's possible that once the gate is down melee players can walk around and attack from there.
Capturing the first two graveyards will enable the workshops, which provide more demolishers and are a good spot to pick up new seaforium charges. If a ![]() [Shadowstep] or
[Shadowstep] or ![]() [Killing Spree] Rogue is on the offensive side, they can use their respective abilities to teleport themselves up behind the turrets and either assault them from there to distract the turret's pilot or run past the gate to capture the next graveyard undetected. Capturing the last graveyard will push the defensive side back to spawn in their own courtyard.
[Killing Spree] Rogue is on the offensive side, they can use their respective abilities to teleport themselves up behind the turrets and either assault them from there to distract the turret's pilot or run past the gate to capture the next graveyard undetected. Capturing the last graveyard will push the defensive side back to spawn in their own courtyard.
If you are having trouble getting demolishers through because of players on foot destroying them, synchronize your demolishers to move in at the same time so that focus will be divided, or at least be too focused to take out every one before they hit the final door.
Clicking the orb at the end will instantly win the round.
Defensive
Strand of the Ancients Defense is unique among battlegrounds in that your team is free to move on the map during the initial countdown to the start of the round. A common mistake by less experienced players is that they stand around at the initial spawn point. The defense absolutely must use the time to get in to position to engage the enemy as soon as they land on the beach.
Right at the start of the game, you want to have people on the turrets for both the blue and the green gates. The rest of the group goes onto the beach getting ready to greet the incoming offense. Defense should be relatively split between the two landing docks, as the offense will also be split evenly on the incoming boats.
The demolishers have to be destroyed as soon as possible to prevent the gates from going down. Therefore, the one demolisher on the beach is often popular to destroy first. Demolishers also take priority to kill over players, unless they were hindering your ability to attack the demolisher. If you can crowd control any players trying to intercept your assault on the demolishers, then do so and continue on the demolisher until it is destroyed. Upon destruction, the driver will dismount and be very vulnerable if caught in a large group that just destroyed the demolisher.
Once the first gate is down (blue or green) the Eastern and Western graveyards are now open for the enemy to take. As soon as these graveyards are taken, the enemy gets better forward position when resurrecting, and additional demolishers from the adjacent workshop. Though it is still more important to destroy demolishers and keep the enemy from breaking the next gate (red or purple), holding these graveyards will do a lot to hinder the advance.
Pay attention to your map as well. Just because you're holding off people just fine at the purple gate might not mean the same for red. All active demolishers are visible on the map to all players. A single demolisher that has reached a gate with no one nearby to destroy it will be able to burn through a gate in about 15 seconds. Be prepared to concede that gate and fall back to the next one.
If there are demolishers incoming to the yellow gate, you will have to fall back and destroy it before trying to push forward again on defense. Typically, once both red and purple gates are down, the entire defense should fall back to the yellow gate and be prepared to destroy vehicles coming from either side. Watch the map to see where the closest demolisher is, and move towards it as a group. Do not wait for it to get within firing range of the yellow gate, or it will eventually go down. Good teams will send demolishers in groups of two from each vehicle emporium, which makes it more important to intercept them early and burn them down before they reach firing range of the yellow gate. Always watch the map and be ready to mobilize and meet demolishers coming from either side.
If the yellow gate goes down, you will have to use it as a chokepoint to prevent players and demolishers from getting past. If your entire group has not moved back and tanks are not going down quick enough before being able to touch the door, you will not have the best chance of lasting the timer.
While in the final courtyard, a few players on the offensive side tend to stray off and go west towards a pile of seaforium charges. If they are not intercepted, they will circumvent your group to the door and plant the seaforium charge. A couple people with good crowd control can guard the steps and prevent a seaforuim assault on the final gate. Though, it is best for most of the team to be at the yellow gate chokepoint, to prevent players from ever getting in the courtyard, and to burn down demolishers as quickly as possible.
If the door to the keep goes down, do your best to drag out the timer for as long as possible by keeping players out of range of the orb either through snares, disorients, stuns, or knockbacks. Any player on the opposing team has to be just lucky enough to charge through and click on the orb in order for the offensive team to win the round.
The most important thing to remember on defense is to hold back anything that can do damage to the gates. This means always attack demolishers as soon as possible, before they are in range of a gate. Also be on the watch for players who rush past towards a gate, as they probably have a seaforium charge to plant. Always work to push the offensive assault back, but be prepared to fall back if something slips through. All it takes is one uncontested demolisher to roll through every gate and lose the match.
Considerations
- Demolisher and turret operators do not get as much honor as they don't get as many honor kills. However, demolisher operators enhance your team's offense which in turn enables it to win faster. Turret operators enhance your team's defense which in turn supports your team in achieving victory. These roles are therefore vital to increasing your team's chance of winning, which leads to more honor for the entire team.
- The initial team on offense has to wait 10–15 seconds before they are allowed to start using the demos.
- Some games may start with one team having double the numbers of the other team. This can cause a problem for the initial Defensive team if they do not join quickly enough to man turret stations and start offensive attacks. However, the same can be said for the initial Offensive team. If members of the Offensive team don't join quickly, the Defensive team can rapidly mount a solid defense that will hinder the Offensive team's assault.
- Classes with pets may have difficulty operating tanks or turrets.
- Demos at the workshops do not despawn when the second offensive team attacks, allowing the second team to grab extra demos before attempting to cap either the East or West graveyards.
- On average, the game awards more honor to the initial attackers, as the initial defenders' chance to earn honor is limited by the speed with which the attackers win the first round. For example: Team A takes 1 1/2 minutes to destroy each wall, winning their round in 6 minutes, while team B takes 2 minutes to destroy each wall and 8 minutes to win their round. Therefore, if team B attacks first, each team has time to gain full honor for destroying all walls, and team A also gains bonus honor for winning. If team A attacks first, team B will only have enough time to destroy 3 of the 4 walls before the game ends, therefore earning less honor regardless of an identical outcome, while team A will earn bonus honor for one of their walls remaining intact, as well as for winning the game.
Achievements
| Title | Description | Reward |
|---|---|---|
| Win Strand of the Ancients. | 10 | |
| Complete 100 victories in Strand of the Ancients. | 10 | |
| Capture the Titan Relic in under four minutes. | 20 | |
| Disarm 5 seaforium charges in a single battle. | 10 | |
| Defend the beach without losing walls. | 10 | |
| Plant 100 Seaforium charges which successfully damage a wall. | 10 | |
| Plant 5 Seaforium charges which successfully damage a wall in a single battle. | 10 | |
| Win a Strand of the Ancients battle without losing any siege vehicles. | 10 | |
| Destroy 100 vehicles using a turret. | 10 | |
| Destroy 5 vehicles using a turret in a single battle. | 10 | |
| Kill 100 players carrying seaforium. | 10 | |
| Kill 5 players carrying seaforium in a single battle. | 10 | |
| Kill 10 players in the Courtyard of the Ancients in a single battle. | 10 | |
| Kill 100 players in the Courtyard of the Ancients. | 10 | |
| Complete the Strand of the Ancients achievements listed below: | 25 |
Notes and trivia
- Remnants of the Path of the Titans can be seen on the western parts of the island.
- Early during the beta, Strand of the Ancients was originally called "Sands of Ulduran", sometimes spelled "Sands of Alduran".[7]
- An unused Teleport spell also mentions Ulduran.
- An unused
- It is fairly common to win Strand of the Ancients in under four minutes. Reaching the Relic in under four minutes completes the [Storm the Beach] achievement.
Gallery

Patch changes
-
 Patch 8.0.1 (2018-07-17): Removed.[1][2]
 -
 Hotfix (2014-10-16): NPCs above level 90 should no longer appear in Strand of the Ancients, Alterac Valley, and Isle of Conquest.
 - Hotfix (2014-03-11): The amount of [Honor] awarded for successfully destroying or defending a gate has been doubled.
- Patch 5.4.0 (2013-09-10):
- Bombs are no longer an item held in the player's inventory and will now do considerably more damage, 4500 (up from 1250).
- Players carrying a bomb now have a button that allows them to place it with a spell effect over their heads.
- Placing a bomb takes 2 seconds, and can be interrupted like a Battleground capture point.
- Disarming a bomb takes 2 seconds, and can be interrupted like a Battleground capture point.
- Demolishers will no longer have the Ram ability and only one will spawn at each stage.
- Hotfix (2013-09-13): Rogues can no longer use Shadowstep on Antipersonnel Cannons in Strand of the Ancients.
-
 Hotfix (2010-12-21): Demolishers are properly spawning in at the beginning of Round 2 in Strand of the Ancients as Preparation fades.
 - Hotfix (2010-12-07): NPCs and vehicles now have the correct Cataclysm values for health and damage in the 80-84 and 85 Strand of the Ancients, Isle of Conquest, and Alterac Valley level brackets.
- Patch 4.0.3a (2010-11-23): Minimum required level reduced to 65, brackets split into 5-level range instead of 10.
-
 Patch 3.3.3 (2010-03-23): Battlegrounds will no longer award Marks of Honor.
- Players with existing Marks of Honor can still turn them in to their respective faction's quest givers, including individual marks for those who may have more marks for one Battleground than another.
- Items which previously required Marks of Honor will have their costs adjusted to remove these requirements.
- Patch 3.2.0 (2009-08-04): The faction starting on attack/defense will now be randomized at the start of each match.
- Patch 3.1.0 (2009-04-14): Capturing the Southern Graveyard will now automatically capture both the East and West graveyards.
- Patch 3.0.8 (2009-01-20):
- Antipersonnel Turrets will now gain vehicle immunities, use falloff damage, and damage increased to 4000 + 200 per level to compensate for falloff.
- The Strand of the Ancients Demolisher has had its health increased.
- The Strand of the Ancients tower cannon has had its health increased.
- Seaforium charges have been moved closer to the graveyards on the 2nd tier.
- Patch 3.0.2 (2008-10-14): Added.
References
- ^ a b
 Blizzard Entertainment 2018-07-16. Battle for Azeroth Pre-Patch Notes - WoW. Retrieved on 2018-07-19.
- ^ a b Arempy 2018-04-27. No more blacklisting? Please modify Strand! - World of Warcraft Forums. Retrieved on 2018-04-27. “Strand of the Ancients has been removed in Battle for Azeroth.”
- ^ Official Game Guide - Strand of the Ancients
- ^ Elizabeth Harper 2008-06-29. WWI '08 Notes from the PvP panel. WoW.com. Retrieved on 2009-06-20.
- ^ Oli Welsh 2008-05-09. World of Warcraft: Wrath of the Lich King. MMO Eurogamer. Retrieved on 2009-06-20.
- ^ Zarhym 2009-06-16. Re: strand of the alliance. Archived from the original on 2009-06-16. Retrieved on 2009-06-20.
- ^ File:Dalaran beta map.jpg, first file revision.
External links
| |||||||||||||||||
| |||||||||||||||||||||||
| ||||||||||||||||||||||||||||||||

