- Not to be confused with World Marker.
- "Lucky Charms" redirects here. For the item, see
 [Lucky Charm].
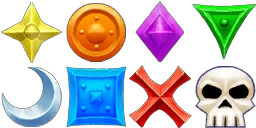
Target Markers (formerly referred to as lucky charms[1] or raid target icons[2]) are icons that raid leaders/assistants and party members can place over players and mobs.
Strategy and usage

Oooh, look at me lucky charms!
The list, in-game
To place a raid target icon over a mob, simply select the mob, right-click on its portrait, and select a symbol from the hierarchical menu. Using these symbols is valuable in parties and even more so in raids.
It is also possible to use keybinds and/or macros to quickly assign raid icons. This can be especially useful for changing targets on the fly, or placing emergency crowd control marks while in combat.
Particular uses include:
- Rather than saying "sheep left, sap right, attack middle", a party leader can say "sheep moon, sap cross, attack skull"; once the convention is established and all players understand what each symbol means, the party leader won't even have to say that. The advantage of this method over the former is that even if the mobs move around, it's still clear what they're designated for (it's also often the case that it's ambiguous exactly who the "left" mob is, and sometimes it's hard and time-consuming to describe which mob you mean using only words).
- Rather than the continual assisting of the raid leader, the raid leader can place icons on mobs and assign players to specific mobs, with "Player X has Skull/X".
- It is also possible to place icons on players to use as stack points (for instance, "Ranged stack on Star").
- The "Skull" lucky charm is almost invariably used to indicate which target should have DPS targeted upon it.
Carrying this further, a Raid Leader could even appoint each of those tanks / Crowd Controllers as Raid Assistant, and let them mark their own targets. Assuming your tanks are on the ball, this can save time where the Raid Leader does not need to be assigning targets, and ensures each person actually has that target targeted. Each tank / crowd controller should always use the same Icon (both within the raid, and even across multiple raids, e.g., "ElfMan always tanks the blue square") for this to work. This is for more advanced use, and some Raid Leaders do not like appointing Assistants.
Example targeting convention
Although there is nothing like a standard convention for icon meanings, the following table may provide a starting point for groups or guilds wishing to create a convention. Obviously, this would have to be altered on a per-case basis depending on group composition (for instance, parties with multiple mages/druids). Still, it can provide a useful foundation for groups or guilds getting used to the raid icon system. Note that icons carry different meanings when placed friendly versus hostile targets.
The guide below is for most specific cases. In general, all marks besides Skull and X denote CC targets on hostile mobs, or various stack points on friendly players. Skull and X will almost always denote kill targets on hostile mobs, or denote danger when placed on friendly players.
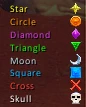
| Symbol | Chat substitutions | Placed on Hostile Target | Placed on Friendly Target |
|---|---|---|---|
| {Star} or {rt1} | Almost always a rogue CC, i.e. |
Usually a group stack point, often placed on a main tank or healer. Often a ranged group or a melee group (or sometimes the entire raid) will be assigned to stack on star. | |
| {Circle}, {Coin}, or {rt2} | Priest CC, i.e. |
Usually a secondary stack point, often placed with a secondary tank/healer. Hence, this is most often used as a ranged stack point. | |
| {Diamond} or {rt3} | Warlock CC, i.e. |
||
| {Triangle} or {rt4} | |||
| {Moon} or {rt5} | Usually a CC target of some sort, especially |
||
| {Square} or {rt6} | Usually |
||
| {Cross}, {X} or {rt7} | Secondary kill target; usually to be off-tanked and killed after Skull | Danger; usually X must leave a stack and avoid other players. | |
| {Skull} or {rt8} | Kill target; focus of all DPS | Danger; depending on context either players must stack on Skull to mitigate a deadly effect, or Skull must be away from other players for the same reason. |
API and key bindings
These icons can be set programmatically in a macro with the SetRaidTarget function.
Example, /script SetRaidTarget("target", 8); will mark the target with a Skull, 8 standing for the Icon number.
Alternatively, they can be bound to keys for quick application. For example, Skull could be bound to Ctrl-K (Kill, sKull) so that the raid leader or assist can apply the icon quickly to a new target during a fight.
For even faster marking, combining the macro /script SetRaidTarget("mouseover", #); (# of course being replaced with the corresponding icon's number) with key bindings will allow you to apply icons without actually targetting anything.
GetRaidTargetIndex returns the icon index of the specified target.
Macros
This macro will cycle Skull, X, Nil, then Moon on cursored targets.
/script if (charm==nil) or (charm <= 6) then charm=9; end; charm=charm-1; if (charm==6) then SetRaidTarget("mouseover", 0) else SetRaidTarget("mouseover", charm); end
This macro will cycle through all the raid icons (including no raid icon) in reverse order on cursored targets. Replace "mouseover" with "target" if you want this to apply to selected targets.
/script if (charm==nil) or (charm <= 0) then charm=9; end; charm=charm-1; SetRaidTarget("mouseover", charm)
This macro also cycles through all the raid icons in reverse order on cursored targets but it also announces the next icon in the default chat frame. Useful if you need to skip through charms while marking targets. Press your macro button without a target under the mouse to skip through charms.
/script if(chrm==nil)or(chrm<=0)then chrm=9 end chrm=chrm-1 SetRaidTarget("mouseover", chrm) nxt={[0]="None",[1]="Star",[2]="Circle",[3]="Diamond",[4]="Triangle",[5]="Moon",[6]="Square",[7]="Cross",[-1]="Skull"}DEFAULT_CHAT_FRAME:AddMessage(nxt[chrm-1])
/script if (charm==nil) or (charm <= 0) then charm=9; end; charm=charm-1; SetRaidTarget("target", charm)
Origin of "lucky charms"
The nickname originates from their appearance similar to the marshmallows from the Cereal Lucky Charms. The commercials feature kids chasing Lucky the Leprechaun, who would inevitably remind them that his cereal contained "Hearts, stars, horseshoes, clovers and blue moons, pots of gold and rainbows, and the red balloon!" These shapes were nearly impossible to identify without the jingle, as the tiny little marshmallow bits bear only the vaguest resemblance to the Lucky Charms they represented.
Patch changes
 Patch 4.3.0 (2011-11-29): Added /tm, /targetmarker macro commands.
 - Patch 4.2.0 (2011-06-28): Raid Marker icons are now visible in all phases of boss encounters.
- Patch 3.3.0 (2009-12-08): Any party member may mark targets (this does not apply to raid groups).
- Previously only party leaders could mark.
- Previously only party leaders could mark.
- Patch 2.4.0 (2008-03-25): Raid markers may now be written in chat channels by typing {skull}.
- Patch 1.11.0 (2006-06-19): Added.
References
- ^ Krystalle Voecks 2007-05-05. Engadget: Tell us about 'yer lucky charms.
- ^ Lisa Poisso 2010-03-04. Engadget - WoW Rookie: Stay on target with raid icons.